Monday, October 16, 2017

Android Tasker Samples: Library of Tasker Profiles and Tasks to make life easier

I compiled and modified some of the following tasks from various open source sources across the internet, the below list of links provided most of the samples,

See below for A) Link to Tasker Library samples in zip and 2) List of links to tasker samples and tasker learning resources


A) Link to Tasker Library samples in zip file. Download, unzip and Import into Tasker.


B) List of Links to samples and misc tasker resources (eg: tutorial vids)

Disable WIFI when wifi not connected for n-sec

https://www.youtube.com/watch?v=E4je_YKNBWA and https://www.youtube.com/watch?v=sB4vu9qSMn4

Sources

https://github.com/ProLoser/Tasker-Presets

https://github.com/noties
https://www.reddit.com/r/TaskerFiles/

Subreddits with some good tasks
https://www.reddit.com/r/TaskerFiles/comments/2xtau3/submit_new_paste_to_pasteeorg_from_within_tasker/
https://www.reddit.com/r/TaskerFiles/comments/2tx3rs/automatically_adjust_volume_during_playback_of_an/
https://www.reddit.com/r/TaskerFiles/comments/27e1ug/task_trigger_action_only_if_x_amount_of_time_has/
https://www.reddit.com/r/TaskerFiles/comments/24raz5/profiledisables_lockscreen_keyguard_when/
https://www.reddit.com/r/TaskerFiles/comments/1yhvbu/task_kill_process/
https://www.reddit.com/r/TaskerFiles/comments/1y8sxj/profile_maximum_brightness_when_executing/


Misc:
https://lifehacker.com/5930652/unleash-the-power-of-android-with-these-automated-apps
http://tasker.wikidot.com/profile-index

http://techsplurge.com/4926/android-awesome-15-tasker-profiles-tutorials/


Turn off WIFI when no Internet Available

1) Using Shell:

a) Profile on polling cycle : Time every n min


b) Using dumpsys wifi | grep curState=NotConnectedState

image

image


2) Using HTTP

he task then is a conditional one, which could be described as "switch off WiFi if I cannot reach the internet". So let's put that together:

  • Condition:
    • Time.
      In the fields, define the time frame this should be active in, and the "repeat" interval.
    • WiFi connected.
      I recommend adding that to safe some juice: If you're already on mobile data with WiFi turned off, there's no need to turn WiFi off – right? Alternatively, you could also use %WIFI ~ on – but that could give you a headache when you just switch it on and, failing to retrieve the URL, Tasker switches it off before it connects ;)
  • Task:
    • HTTP Get
    • WiFi (off) IF %HTTPR ~ –1


Disable mobile data on WIFI, some arguments about when Android OS kicks in, and battery use (timespane when switching from WIFI to mobile,)

The moment you don't have wifi anylonger, the phone starts a fullburst search for wifi and 3G/4G networks (even if I don't want wifi/data at the moment). and this drains a hell of a lot of battery. then (if you go out e.g.) it finds a 3g/4g-connection which it tries to keep up (drains a lot battery) and in the same time searches for wifi-networks (also drains battery)... very inefficient use of battery

https://forum.xda-developers.com/xperia-z/themes-apps/toggle-wifi-mobile-data-tasker-t2591546

Wednesday, October 4, 2017

Photo Management: Edit EXIF and MetaData, Organize, Edit & Upload to Google Photos. Tools and the steps.


I. Edit EXIF and MetaData

EXIF Data as Tool Tips or Advanced Propeties via Shell Extension

1. View EXIF Data for Images from Windows (Via some Shell Ext) and stand alone tooles:

Fast Preeview : Integrate with Windows Explorer, with Clickable MAP!!! setupexe -> FastPreview-x86_64-4.1.exe

PhotoME : Detailed EXIF info single photots, setupexe –> PhotoME079R17Setup.exe

FastStone PhotoViewer, View EXIF in batch mode in viewer with, setupexe –> faststoneviewer.exe

Misc Tools  JPEGsnoop_v1_8_0.zip & ExifDataView

2. Edit EXIF Data, in Batch Mode!!

Geo Tagging App, Freeware, BATCH UPDATE GEO DATA!!

                 Good Blog on how to use it

GeoTag from SourceForge, little newer

  • install
  • configure
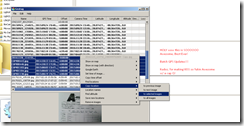
  • add photos, copy location from 1 photo to others, ect ect, AWESOME batch functionality!
    image

Here is workflow to use it GetTag:

Here's the simplest solution. I wanted to geotag a batch of photos before uploading to Google My Business for SEO purposes. Now that Picasa is gone, my searches led me to lots of out-of-date software. I used the LATLONG site for latitude and longitude. In GEOTAG (uploaded a bunch of photos), I entered that info plus business name, town, description, etc. To copy info from the first to the last photo, hold the shift key and press the down arrown. All copied in the column! Get both free from here:


http://www.latlong.net/

A really good video on geotagging for business reasons: https://www.youtube.com/watch?v=__Xus6mFjq8&t=9s

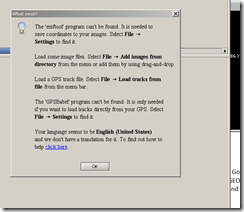
preReq: GPSbabel (http://www.gpsbabel.org) and EXIFtool (http://www.sno.phy.queensu.ca/~phil/exiftool).

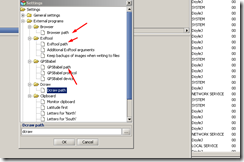
Then add paths

"C:\Program Files (x86)\GPSBabel\gpsbabelfe.exe"

"C:\Work\Tools\Media\Imaging\EXIFViewer\exiftool(-k).exe"

  • download
  • rename to exiftool.exe
  • save to c:\windows\system32
  • set runas admin on props


image

Set settings

image

3. Via Tool tip per this article

Another ref

Open RegEdit


to this

II. Organize : Move Images into organizes Folder Structures

This is a supplement/extension to the existing post from June 2017, see here

After reviewing tools. I decided to use PhotoMove, instead of combining freeware tools like batch rename with files to folders. The low cost of PhotoMove allows me to save $ and use just 1 tool.

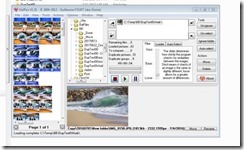
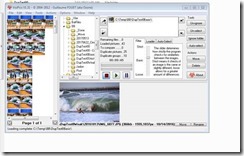
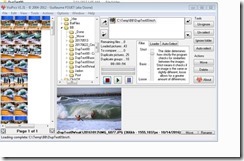
1. Remove Duplicates with VisiPics, See here for more links on Dup tools

image

2. Organize & Move Images into organized folders. using PhotoMove

Alternative: Freeware, combining freeware tools like “batch rename” with “files to folders” See full how to here:

3. I Still for batch rename files and folders, (Freeware tools)  use “batch rename” & “files to folders” individually as they are great tools

III. Edit & Upload to Google Photos

1. ABCDSee

2. LightRoom

3. Ect

and them publish photos to Google Photos

See google photos workflow here


IV. Misc Info on Menus


HKEY_CLASSES_ROOT\SystemFileAssociations\.jpg

To give another real-life application, the default information displayed for JPG picture files are only the file type (JPG), the date taken, rating, the size of the picture (in pixels), and the size of the file.

Or in other words, the registry Infotip entry contains the following properties by default:
prop:System.ItemType;System.Photo.DateTaken;System.Keywords;*System.Photo.PeopleNames;System.Rating;*System.Image.Dimensions;*System.Size;System.Title
I would like to display more information in the Windows Explorer infotip, so I changed the registry entry to:
prop:System.ItemType;System.Photo.DateTaken;System.Keywords;*System.Photo.PeopleNames;System.Rating;*System.Image.Dimensions;*System.Size;System.PropGroup.Camera;System.Photo.CameraManufacturer;System.Photo.CameraModel;System.Photo.MeteringMode;System.Photo.ExposureProgram;System.Photo.ExposureBias;System.Photo.ExposureTime;System.Photo.FNumber;System.Photo.ISOSpeed;System.Photo.WhiteBalance;System.Photo.LensManufacturer;System.Photo.LensModel;System.Photo.FocalLengthInFilm;System.Photo.FocalLength;System.Photo.SubjectDistance;System.Photo.Flash;System.Photo.FlashEnergy;System.Photo.FlashManufacturer;System.Photo.FlashModel;System.Photo.LightSource;System.Title


On my system changed:

20171004
from
prop:System.ItemType;System.Photo.DateTaken;System.Keywords;*System.Photo.PeopleNames;System.Rating;*System.Image.Dimensions;*System.Size;System.Title

to
prop:System.ItemType;System.Photo.DateTaken;System.Keywords;*System.Photo.PeopleNames;System.Rating;*System.Image.Dimensions;*System.Size;System.PropGroup.Camera;System.Photo.CameraManufacturer;System.Photo.CameraModel;System.Photo.MeteringMode;System.Photo.ExposureProgram;System.Photo.ExposureBias;System.Photo.ExposureTime;System.Photo.FNumber;System.Photo.ISOSpeed;System.Photo.WhiteBalance;System.Photo.LensManufacturer;System.Photo.LensModel;System.Photo.FocalLengthInFilm;System.Photo.FocalLength;System.Photo.SubjectDistance;System.Photo.Flash;System.Photo.FlashEnergy;System.Photo.FlashManufacturer;System.Photo.FlashModel;System.Photo.LightSource;System.Title


Appendix : VisiPics Dup Test Results:

25 dups

clip_image002

15 dups

clip_image004

15 pics
clip_image006

Friday, August 11, 2017

Bus Schedule : EFSC 2017 - 2018

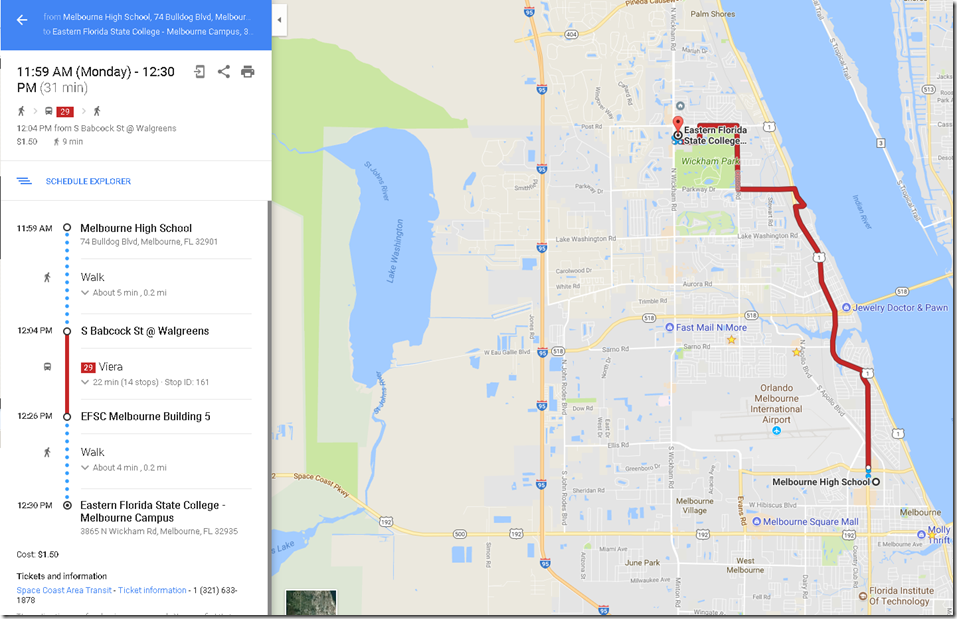
Mel Hi to EFSC: 11:59AM to 12:31PM, Bus 29

Link

https://goo.gl/maps/ccnjYoteWVQ2

Map

1


OR

Option 2: 12:59 to 1:30PM, Bus 29

https://goo.gl/maps/iPmiwUBtZVN2

2


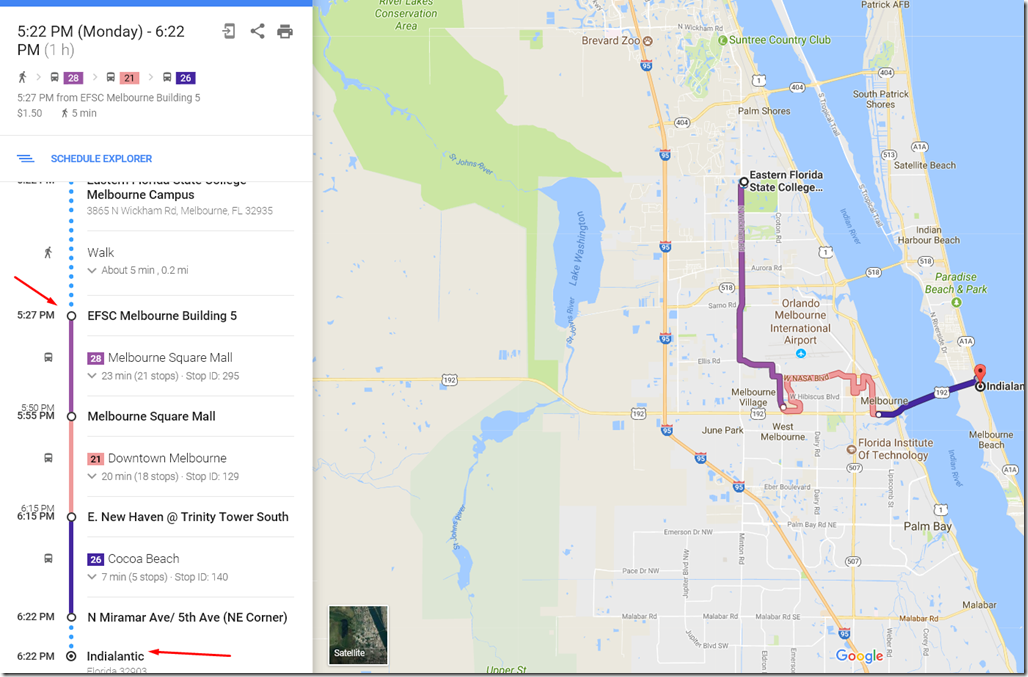
EFSC to Indialantic: 5:22PM -6:22PM, Bus 21 28 26

Link

https://goo.gl/maps/KywSHp6adZK2

Map


Screenshot_4


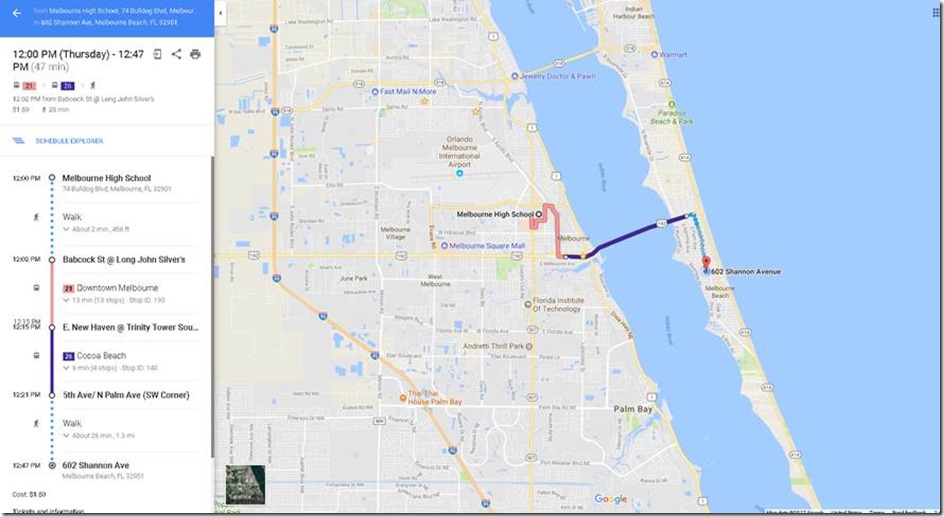
Mel Hi to Home

Mel Hi to Home: 12:00 PM – 12:47

https://goo.gl/maps/PGu4Yeh9h1A2

clip_image002

2:00 PM (Thursday) - 2:47 PM (47 min)

https://goo.gl/maps/4g96LpCS8G92

clip_image004

Thursday, August 10, 2017

Notes from Comparing and Buying a NAS for Home office and Media Storage and Serving

Looking at upgrading from a personal cloud to a proper NAS, I had a few key goals in mind to pick the best NAS for me,

The following bullets are what I am seeking in a NAS:

1) Speed : Wired Throughput, Wifi file transfer & Wifi VideoStreaming 

2) Video Encoding performance

3) Failover

4) Durability

5) Price


WINNER:

Synology DS216+II

And above all the Qnap Reviews on Amazon and B&H Pointed me away from QNap

Forum reviews and review: Buy Here

https://forum.synology.com/enu/viewtopic.php?t=122826

https://www.reddit.com/r/synology/comments/5z2n3s/ds216play_or_ds216ii/

https://www.youtube.com/watch?v=38k4ENBL5lA

http://naschart.com/compare/western-digital-my-cloud-ex2-ultra-wdbvbz0000nch-68,synology-diskstation-ds216-ii-ds216p2-33,qnap-ts-251a-ts-251a-103

Drives

Compatability


Some notes gathered while comparing NAS’s & related

Speed: Notes and Best Practices for Wired

USB 3.0 : 625 megabytes per second. hard drives are usually fast enough to edit 1080p HD video. If they’re solid state drives (SSDs),’

eSATA : Some PCs have eSATA cards which allow you to use this standard which can read up to 750 MB/sec.

Thunderbolt 2 : MACs and Many new PCs, is fastest, however need PC with port, up to 2500 megabytes per second,

Thunderbolt 3: MACs and some PCS 5,000 megabytes per second WOOT

Best Choice: Thunderbolt Storage Device LaCie Rugged USB 3.0 Thunderbolt

recommend purchasing hard drives and RAID systems for editing in sets of two: if you buy one 2TB hard drive to store your footage on, buy a second 2TB hard drive to store a complete backup of your footage as well 

image

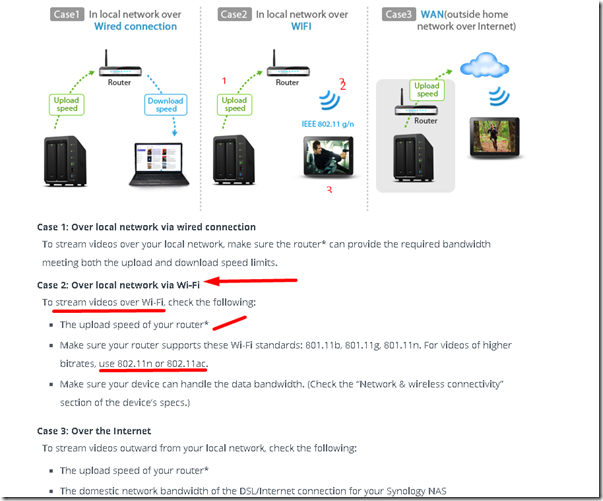
Speed: Wifi Video Streaming, excellant reference: from Synology

** Before testing wifi, be sure to fix any WIFI network issues, see Top 5 ways to fix WIFI Speed issues

Speed Test tools:

1. NAS Upload Speed : NAS providded Speed tester: also If NAS can transcode, the transcoded video might have lower bitrate, and you only need to meet lower bandwidth requirements.

2: Router Upload Speed : TYry SpeedTest.net if you want to know the upload speed of your home router

3. Device Download Speed:  Download the "Speed Test"
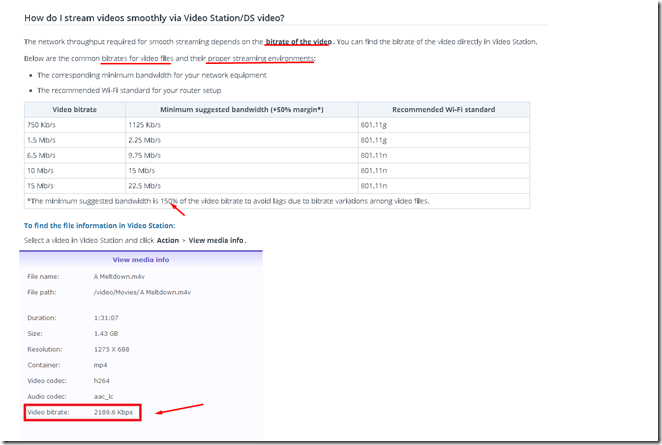

image

Comparing Wired, WIFI Internet:

image

First lets compare some home network speed requirements as a baseline of what we need

From

https://www.topnettricks.com/high-speed-home-media-network/


Pick a NAS:

20170824

NAS Storage

http://www.computershopper.com/feature/2017-guide-the-best-nas-drives-for-homes-and-small-offices

TS

https://www.pcmag.com/article2/0,2817,2401086,00.asp

QNAP TS-251

External HD:

Fastest 2017

Samsung T3 – the fastest external hard drive on the market

https://hddmag.com/2017/06/external-hard-drives-for-video-editing.html

Picks:

http://thewirecutter.com/reviews/best-network-attached-storage/

QNAP Turbo NAS TS-251 i

or

Ts-251A, it has 4K streaming.

or

Ts-251+

Pros

Capacity: N/A | Interface: 2 x Gigabit Ethernet, USB 3.0 | Features: Remote file access, HDMI out, 4K media transcoding, DLNA

Feature-packed media NAS

two drive bays.

two USB 2.0 ports and two USB 3.0 ports, also has an HDMI port, s

p to 8 GB of memory, the TS-251 has more-powerful hardware than most NAS device

linux-based OS is

Intel Celeron 2.41 GHz dual-core processor and either 1 GB or 4 GB of RAM,

Mobile app: QNAP’s app is the bes

Remote access and app access by enabling HTTPS

CONS;

streaming a 1080p MKV video from the NAS to the Qvideo app on an HTC One via 802.11ac Wi-Fi.

n-the-fly and offline high-definition video transcoding, so you can store HD video on the TS-251 and stream it to another device in

DS216+II is a powerful home NAS with similar features to our main pick. It lacks HDM

Synology DiskStation DS412+

4 bay for maximum protection

Capacity: Up to 32TB | Interface: 2 x Gigabit Ethernet, USB 3.0, eSATA | Features: Quad bay, can be expanded, wake on LAN

Best Streaming:

X2 Ultra

Western Digital My Cloud EX2 or WD My Cloud EX2 or WD My Cloud EX2 Ultra

https://www.techhive.com/article/3143648/network-storage/best-nas-box-for-media-streaming-and-backup.html#toc-1

The small business version of the My Cloud Mirror is now even better

Capacity: 4TB, 8TB, 12TB, 16TB | Interface: Gigabit Ethernet, USB 3.0 | Features: Remote file access, RAID features, My Cloud OS 3 software

Synology DS216play

https://www.lifewire.com/best-nas-network-attached-storage-4140167


Test Process:

Summary:

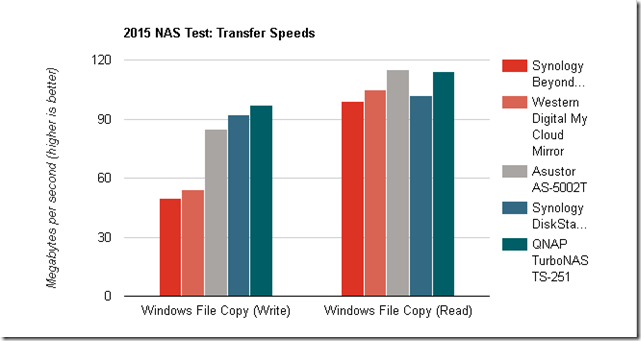
easiest way to measure real-world NAS performance, at least for what you’re going to be doing with a home NAS, is to copy files to and from the NAS and calculate the data rate. For the NAS devices we tested in 2015, we connected each via Gigabit Ethernet to TP-Link’s Archer C9 Gigabit Router.

Detail:

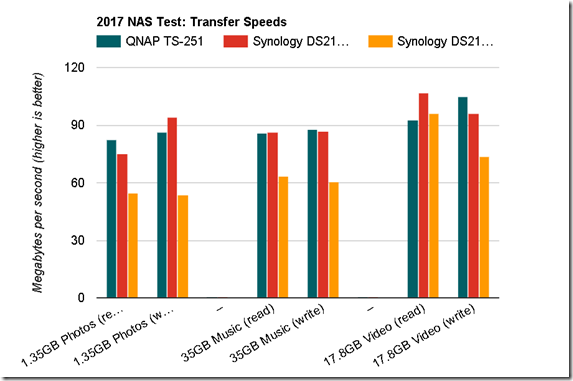
Robocopy file-copying tool to read and write three datasets to each NAS: a 1.35 GB photo folder containing 216 individual JPEG files; a 35.2 GB music folder with 8,961 MP3 files in it; and a single 17.8 GB high-definition MKV (movie) file. We ran each test three times in each direction (writing to the NAS and reading from it) and averaged the results.

NAS Peripherals to get

TP-Link’s Archer C9 Gigabit Router. Best router for under $100: TP-Link Archer C7 (AC1750)

(a.k.a. Nighthawk X4S Smart WiFi Gaming Router)

https://cordcuttingreport.com/2017/01/21/best-router/


wireless Keyboard/mouse if VM

Thunderbolt capable laptop (if port avail)

easiest way to measure real-world NAS performance, at least for what you’re going to be doing with a home NAS, is to copy files to and from the NAS and calculate the data rate. For the NAS devices we tested in 2015, we connected each via Gigabit Ethernet to TP-Link’s Archer C9 Gigabit Router.

Wired Storage Devices for Video Editing:

http://documentarycameras.com/best-hard-drives-raid-systems-film-video-editors/


Thunderbolt Storage Device

LaCie Rugged USB 3.0 Thunderbolt

https://www.cnet.com/products/lacie-rugged-usb-3-0-thunderbolt/review/


LaCie Rugged Thunderbolt and USB 3.0 2TB Portable Hard Drive STEV2000400

G-DRIVE ev ATC New! G-Technology

http://www.videoguys.com/blog/videoguys-recommends-g-tech-external-drives-above-all-others/


Super expensive

https://www.qnap.com/static/landing/useng/videoproduction/


http://thewirecutter.com/reviews/best-network-attached-storage/


Useful Charts / Tables for Network, Service and Drive Performance Comparisons

Compare NAS’s
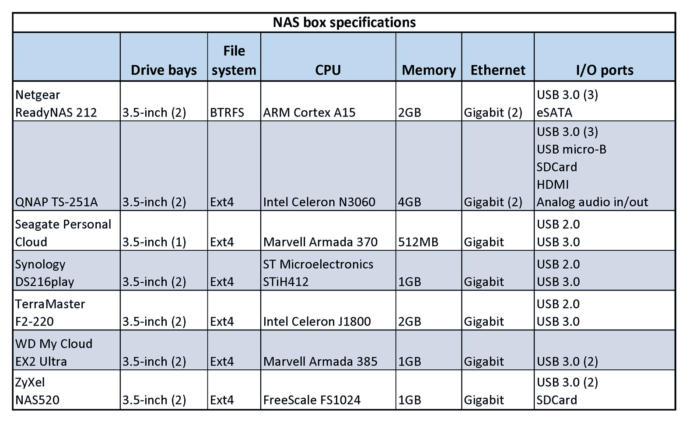
NAS roundup features


NAS Speeds

image

image

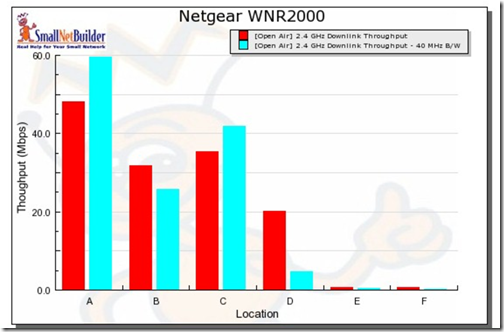
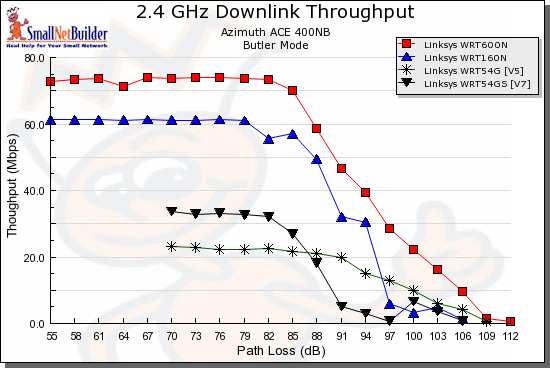
WIFI comparison Througput :

image


Compare Common Apps Netwoth throughout min requirements

image

WIFI Channel Bonding Compare                                                                                               

image

image

Summary of how to Fix slow WIFI networks

Excerpts from

Fix #1: Use the Correct Measure


     To get a more accurate measure of the speed of your wireless connection, you need to use a method that actually measures the speed that your connection is delivering. include:
     Timing a drag-and-drop filecopy and calculating speed (file size / transfer time). LAN Speed Test does essentially the same thing, but automatically for Windows-based systems.
     Running a file copy and using the Networking monitor in Windows Task Manager or Vista's Reliability and Performance Monitor (Start > Run perfmon.msc)
     Using NetMeter while watching or listening to a stream or transferring files. (There is also a similar program of the same name from Brothersoft.)
     Tools: Simpli-File Statistics, FastCopy.exe

Fix #2: Use 802.11n Clients


     Only an 802.11n client has what it takes to get higher throughput from a draft 11n router.
     802.11n can provide higher throughput at a given location than 802.11b/g

Fix #3: Don't Connect Draft 11n and 11b/g clients to the same router


     mixing 11n and "legacy" clients can reduce throughput by 50 to 80%.
    

Fix #4: Use WPA2/AES and Enable WMM


     Most 802.11n products will knock your throughput down by up to 80% if you use WEP or WPA/TKIP security
     WMM must be enabled in order to get link rates higher than 54 Mbps

Fix #5: Don't use Channel Bonding


     Channel-bonding trick can provide a 10 to 20 Mbps throughput increase, but usually works best under strong signal conditions.

Downlink throughput comparison - Linksys