Monday, December 9, 2019

Windows 10 Clean Up Shell Context Menu for File, Folder

Right click menu taking a long time to appear? Clean up menu’s that are taking time & obsolete on your system; these worked for me:

1. Remove NVIDIA “Run with Graphics” menu from context menu

2. Remove Other menus using ShellEx:

3. Remove “Gove access to” menu

Open RegEdit

        Go to : 
        HKEY_LOCAL_MACHINE\SOFTWARE\Microsoft\Windows\CurrentVersion\Shell Extensions\Blocked

Create a new string value here named {f81e9010-6ea4-11ce-a7ff-00aa003ca9f6}.

4. Remove other annoying menus:

including:

"restore previous versions" :  {596AB062-B4D2-4215-9F74-E9109B0A8153}

"shared folder synchronization" : {6C467336-8281-4E60-8204-430CED96822D}

“Give access to” : {f81e9010-6ea4-11ce-a7ff-00aa003ca9f6}

All 3 disabled should look like:

5. Remove Folder Shell Menus, for example “Include in Library” ect ect

Open RegEdit

Browse to Computer\HKEY_CLASSES_ROOT\Folder\shellex\ContextMenuHandlers

Delete Keys that are not needed

Thursday, December 5, 2019

Visual Studio 2017 IDE Editor and Refactor Enhancements

1. In Editor Object/Property Hierarchy Tool Tip

See https://youtu.be/CZwNvU_Qtig?t=64


2.  Refactor Object Initialization:

See https://youtu.be/CZwNvU_Qtig?t=103

3. Split String Literals on Enter!

See https://youtu.be/CZwNvU_Qtig?t=187

4. Convert String.Format to String Interop (replace tokens with variable Names)

https://youtu.be/CZwNvU_Qtig?t=243


5. Create new file from class or rename file to class name

https://youtu.be/CZwNvU_Qtig?t=286

and https://youtu.be/CZwNvU_Qtig?t=349

6. Filter Intellisense list on-demand, Show Intellisense on Del/BkSpc

https://youtu.be/CZwNvU_Qtig?t=413

and https://youtu.be/CZwNvU_Qtig?t=578


7. Find Reference Changes:

https://youtu.be/CZwNvU_Qtig?t=693

8 Edit | “Go to” or Ctrl-T enhancements:

https://youtu.be/CZwNvU_Qtig?t=823

Monday, December 2, 2019

Productivity Apps December 2019 : Share Files, Type faster, Work faster

Some very cool new apps on the scene, share data between computer and phone seamlessly, track your work, type smarter, work smarter spend less time searching.

Check out All APPS here:


     https://zapier.com/blog/best-windows-productivity-software/
    

         Pushbullet


         Pushbullet connects your devices, m aking them feel like one.Send texts, files, and links to and from all your devices
        

        ClipBrd Chome Extension AND Android APP,

Share Clipboard between Phone and Computer!


         DittoClipboard (Clipboard Ring)


         Share Clipboard between muyltiple devices

        WinSplit Revolution 11.04 (Christa)


         Snap Windows Together

Tutorials: AWESOME!

https://www.youtube.com/watch?v=jdrH75ZAQIw
https://www.youtube.com/watch?v=2aW70A1Vdi0
        

        RescueTime (Christa)


         How much time are you spending in each site? Where am I working/spending the most time in my day?
        

        AutoHotKey (Christa)


         Automate Repetitive Computer Tasks as Macros

Friday, November 22, 2019

Get Count of items in a Google Drive Folder

So , you uploaded 100+ files to a Google Drive folder, you upload, you wait and now you want to confirm,. However, now there is no easy way to check that file count in the Google Folder,. While on Windows (or your OS of choice) there is a method to easily check the file count in said folder, in Google Drive folders there is not. Thus due to Google’s infinite wisdom of not supplying an OS equivalent Folder operation like “Count” for users, there are several “hacks” that we as users must perform in order to get the what one would think is an intrinsic property such as Folder Item Count,. Programmatically, this would be something like Folder.Items.Colunt or some other qualifier/property accessor.

Thus here we are, as users to implement a-round about way to access such property that should in a just world would simply be available from the Right Click / Context Menu!


Method 1:

  • Right-click on a folder and select 'Download'. You'll often (but not always) see a count of the included files.
  • Open a folder, scroll to the end of the list, type A to select all, choose 'More' and select 'Move to'. That will give you a total number of files, after which you can cancel the move.
  • Control-click a folder to open in a new tab. The new tab will show the number of files, but only if there are less than 500.

Method 2 :

1. open the folder
2. repeatedly scroll down until you reach the end the folder. You can use the End key
3. select all the files using Shift+A
4. mouse over the "share" button to see the number of files: "share N items".

Wednesday, October 16, 2019

fast Copy Filter Folders / Exclude Folders

FastCopy: exclude directories and delete files unique to destination #

  • To copy all files and folders on S: except for S:\foo\ and S:\bar\, check the Filter box and enter \foo\ ; \bar\ into the Exclude field. Omitting the leading backslash will skip all directories named "foo" or "bar", regardless of location.

  • Options to review when enabling the filter: Option > Main Settings > Copy/Move Options > "Don't create empty directory, if 'Filter' is checked." and Option > Main Settings > Delete Options > "Try to delete directory, even if 'Filter' is checked."

  • Delete files and folders unique to the destination by changing the operation mode in the dropdown box from the default "Diff (No overwrite)" to "Sync (Size/Date)"

  • Appending a backslash to the target directory will result in a new directory being created therein.

  • See Screen shot here

Wednesday, September 25, 2019

Filmora Settings for Windows Performance

Filmora

1. Enable GPU

https://www.youtube.com/watch?v=TZ8x5zIudPg

see also: http://support.wondershare.com/how-tos/what-shall-i-do-if-it-fails-to-enable-gpu-accelerate.html

2. Convert with WonderShare:

https://www.wondershare.com/topic/gpu-optimization.html

3. Other Settings

The following list contains suggestions for ensuring optimum performance when working with your Filmora editing application on a Windows Vista, Windows 7 or Windows 8 system:

· Disable CPU throttling.

· In Control Panel > Hardware and Sound > Power Options, select High Performance.

· Do not enable the Windows Display setting “Show window contents while dragging.” This setting hinders redraw performance on your Filmora editing system.

· In Control Panel > Appearance and Personalization > Personalization > Window Color and Appearance > Effects, deselect Show window contents while dragging.

· Enable setting to adjust for best performance.

· In Control Panel > System and Maintenance > System > Advanced System Settings > Performance Settings, select Adjust for best performance.

· Disable Desktop compositing.

· Follow this guide here regarding correct Desktop Composition Settings

· Disable Windows Defender.

· In Control Panel > Security > Windows Defender > Tools > Options > Administrator Options, deselect Use Windows Defender > Save.

· Disable Sidebar.

· Right-click the Sidebar or Sidebar icon on your desktop > Properties > Deselect Start Sidebar when Windows starts > Right click icon and select Exit.

· Disable Hibernation in the Power options.

· In Control Panel > System and Maintenance > Power Options > Change when the computer sleeps > Put the computer to sleep, select Never.

· Set automatic updates to Notify you but don’t automatically download.

· In Control Panel > System and Maintenance > Windows Updates > Change settings, select “Notify me but don’t automatically download them or install them.”

· Turn off the firewall for Filmora Interplay.

· In Control Panel > Security > Windows Firewall, select Turn Windows Firewall on or off.

· Do not leave the Console window open when you edit. The performance of your Filmora editing system slows considerably when the Console window is open.

· Do not leave a Windows Explorer window open. Windows Explorer attempts to update file information.

· Do not leave an e-mail application open if it is set to do periodic checks for mail.

· Do not run any application that periodically “wakes up” and performs an action.

· Disable screen savers.

· Do not keep media on the same partition where you install your Filmora editing application. Filmora recommends external media drives.

· Always use small fonts with the display driver to avoid missing characters in the dialog boxes in your Filmora editing application.

· After you move a drive from one system to another, restart your system. Windows does not recognize the drive until you restart.

· Ensure you do not accidentally delete locked items from your desktop.

· Right-click the Recycle Bin icon on your desktop > Properties > General tab > Display delete confirmation dialog.

· When you advance by single frames through the Timeline, deselect Render On-the Fly to enable faster response time.

· In your Filmora editing application, deselect Clip > Render On-the-Fly

· Do not name files with special characters (/ \ : ? ” < > | *). Windows does not recognize special characters in file names. Bin names are limited to 27 characters (not including the four characters reserved for the file name extension).

· Do not schedule automatic backups at times when your Filmora editing system might be in use.

Davinci Resolve Settings for Windows Performance Boost

1. Proxy Mode

https://gfycat.com/CompetentConventionalFieldmouse

2. Render Cache

https://gfycat.com/SparklingHarmoniousFairybluebird

3. Render Cache O

https://gfycat.com/ElasticScientificEasternglasslizard

4. Optimize Media Render Cache

http://prntscr.com/pb0ytk

5. Extra Display

https://www.youtube.com/watch?v=-sn9ajcLKYY

Wednesday, September 18, 2019

Windows 10 Network Reset Options

1. Cmd Line:

1. Command prompt, and then select Run as administrator > Yes.

2. At the command prompt, run the following :

  • Type netsh winsock reset and press Enter.
  • Type netsh int ip reset and press Enter.
  • Type ipconfig /release and press Enter.
  • Type ipconfig /renew and press Enter.
  • Type ipconfig /flushdns and press Enter.

See also


2. Via Settings GUI

Note

To use network reset, your PC must be running Windows 10 Version 1607 or later. To see which version of Windows 10 your device is currently running, select the Start button, then select Settings > System > About.

  1. Select the Start button, then select Settings > Network & Internet > Status > Network reset.
    Open Network & Internet Status settings
  2. On the Network reset screen, select Reset now > Yes to confirm.

    Wait for your PC to restart, and see if that fixes the problem.

Notes

See also


3. SurfaceBook 2 Specific Network Reset options:

Log in as admin , run "SurfaceDiagnosticToolkit_SA". Restarted

and…

Ok, problem solved. In another thread, a MSFT support person suggested connecting via Wi-Fi and installing updates with the Surface2 Pro in the dock, then do a shutdown and restart I installed the update correctly but needed to restart the Dock as well as the Surface2 Pro. (The instructions did not mention shutdown and restart on the dock...) After pulling the dock plug and re-energizing, the Ethernet port connected immediately with the router. The Ethernet driver for the dock is an Optional Update, so the user needs to view the windows update details and check the update "ASIX... driver for Ethernet...whatever" to download and install the optional update.


See also

Monday, September 16, 2019

SSD drives and Windows 10 Defrag

For those with, and all that eventually will have, an SSD drive:

Do not defrag that SSD!

Do not defrag with a 3rd party utility!

However if you have Windows Defrag scheduled, windows 10 defrag is smart enough to not defrag the SSD unless absolutely necessary and will only defrag using a trim method specific to SSD drive,


More info here

Saturday, September 14, 2019

Image GPS + GeoTag : Update Image GPS and view GPS coordinates for image(s)

See here example of
A) Update GPS for 1 + images using XnView | GeoSetter , use XnView Open with External Programs
B) View Image using GPS coord to index images by map. Use app "GeoPhoto" with integrated map + photo heat map clustering, App provided via MS
See example here:
https://gfycat.com/PepperyShadowyBluebottlejellyfish

Saturday, August 17, 2019

WinRAR Command Line Examples

Some examples of using WinRAR from command line to automate zipping of files into chuncks:


-- chunk folder into a rar in 700MB increments
"c:\Program Files (x86)\WinRAR\WinRAR.exe" a -afrar -v700m "C:\Temp\Destination.rar" "C:\Temp\SourceFolder"


-- another
"c:\Program Files (x86)\WinRAR\WinRAR.exe" a -afrar -v700m "C:\_bu\wwwroot.rar" "C:\_bu\wwwroot"

Monday, July 29, 2019

Search using Date Range in Windows and GMail

1. Windows

- Date between 3/26 and 3/28

datemodified:‎3/‎26/‎2019 .. ‎3/‎28/‎2019

- Other Date Examples,

modified:2/1/2016 .. 2/20/2016
Note the two periods between the dates, this tells the search engine to use it as a range. You could also use “Datecreated:” or just “date:” instead of “modified:” if you wanted to.

- Advanced Examples Here

2. Gmail:


Before/After Date


     before:2018/9/1
     after:2018/9/1 before:2018/11/18
    

Before/After Relative Date (instead of specific date)


     newer_than:2d
     older_than:30d

Search multiple labels!


         label:(sent OR inbox)
         label:(sent OR inbox) Indeed
         label:(awork-jobs OR awork-jobs-jobsites) Indeed
         label:(awork-jobs OR awork-jobs-jobsites | awork-jobs-melbourne) older_than:30d
         label:(label:awork-jobs-remote) older_than:30d

Sunday, July 28, 2019

Setup Office365 Email account in Outlook 2010 or 2013


Quick Settings
Incoming Settings:
  • outlook.office365.com
  • port 995
  • SSL applied/ticked

Outgoing Server Settings:
  • smtp.office365.com
  • port 587
  • SMTP authentication applied/ticked
  • TLS applied/ticked
  • Authentication - password
Step by Step Instructions
  1. Open Outlook 2010.
  2. Select the File tab.
  3. Click on + Add Account.
  4. Complete the following Fields:
    • Your Name
    • Email Address
    • Password
    • Re-type your password 
  5. Click Next, a window will appear advising you that it is configuring the network settings.  An Error may be displayed asking you to search unencrypted.
  6. Click Next. If this fails to connect and you receive an error message tick the  Manually configure server settings box and click Next.
  7. Select Internet E-mail and click Next.
    • Select POP3 form the Account Drop Down.
    • In the 'Incoming mail server' field type outlook.office365.com
    • In the 'Outgoing mail server' field type smtp.office365.com
    • In the Username field type in your full email address
    • In the Password field enter your email password
  8. Click on More Settings.
  9. Click on the Outgoing Server tab.
  10. Tick My outgoing server requires authentication.
  11. Ensure the radio button next to Use the same settings as my incoming server is selected and click Ok button.


  12. Click on the Advanced tab.
  13. In the Incoming server field enter 995.
  14. Tick This server requires an encrypted connection (SSL).
  15. In the Outgoing server field enter 587.
  16. From the drop down menu next to Use the following type of encrypted connection select TLS.
                                    
  1. Click OK.
  2. Click on Test Account settings and a results window will be displayed.
  3. Click Close to continue. A confirmation screen will be displayed.
  4. Click Finish. A list of email accounts will then be displayed.
                                
Click Close.
  You should now be able to send and receive emails.


Chrome Extensions for Text Productivity


Copy and Paste, Multi-Line, Multi-Copy, Allow Copy on Blocked Pages ect

MultiLine Text Selection

MultiSelect

Copy Plain Text

Multicopy

Selectable

Allow Select and Copy

Allow Right Click


Background on User-Select: none Blocked Web pages
https://stackoverflow.com/questions/42437433/disable-select-allow-copy-paste
https://stackoverflow.com/questions/7101982/enabling-blocked-text-selection-using-javascript

Office 365 Outlook Find POP, IMAP and SMTP Servers

1. go to portal.office.com

2. Open Outlook app

3. Gear Icon | Your app settings | Mail |

4. Expand Tree: Mail | Accounts | POP and IMAP

Normally servers are:

POP setting
Server name: outlook.office365.com
Port: 995
Encryption method: TLS

IMAP setting
Server name: outlook.office365.com
Port: 993
Encryption method: TLS

SMTP setting
Server name: smtp.office365.com
Port: 587
Encryption method: STARTTLS


For more info see : here

Thursday, July 11, 2019

Clipbrd Beta is Awesome, Share Clipboard between Devices.


Install this, I did step 1 and 2, YOU just need to do step 3 and 4.
      AWESOME Chrome Extension. Copy on Computer, Paste on Phone; Copy on Phone, Paste on Computer.
     This saves times for work and personal stuff.

1. Install ClipBrd in Chrome.
     https://chrome.google.com/webstore/detail/clipbrd-beta/febnkhppinonnjgfjdigiipdajophkkk?hl=en
2. Create an account.
    

3. Install ClipBrd on Your PHONE, from Playstore.
4. Login using same account from step 2.
5. Done.

Friday, June 14, 2019

Office 365 Subscriptions: Developer vs Business vs Enterprise

and

E1 vs E3 vs E5 ect.

So MS just cleared things up a bit or added dirt to the water even more depending on your view point.

I will break this into 2 areas: Developer Subscriptions and Business Subs.

MS announced June 2019 that Office 365 Developer is now 90 day auto-renewing, changing from yearly expiring. This now means A) tenant can be preserved over time without need to move to a new tenant or pay subscription at end of year and B) you need to refresh+access your dev tenant at least every 90 days to ensure the subscription does not expire. .

Office 365 Developer

Start here : subscription is an Office 365 Enterprise E3 Developer subscription with 25 user licenses. It lasts for 90 days and is free to use for development


Expiration Changes

New Office 365 Developer Subscription expiration rules


2 ways to get O365 Developer Subscription:

O365 Developer Subscription via Visual Studio Subscription

- VS Professional= 249 per yr includes O365 Dev Sub

https://my.visualstudio.com/benefits

O365 Developer Subscription via Direct

- 90 Day Free or

- Yearly Paid Sub : 99 per yr (or 8$ per mos)

https://developer.microsoft.com/en-us/office/dev-program 

Excellent Step by Step how to Create


Create a test Environment

Office 365 dev/test environment

and

See Data into O365 Tenant and SharePoint Online

and

Azure Hybrid Setup w/ Azure Credits

What’s Includes and NOT includes in O365 Developer Subscription?


Your developer subscription includes the following:

Exchange Online (Plan 2)
Flow for Office 365 Plan 2
Microsoft Forms (Plan E5)
Microsoft Planner
Microsoft Stream for Office 365 E5 SKU
Microsoft Teams
Mobile Device Management for Office 365
Office 365 ProPlus
PowerApps for Office 365 Plan 2
SharePoint Online for Developer
Skype for Business Online (Plan 2)
Sway
To-Do (Plan 3)


What is NOT includes:

PowerBI (PowerBI for free)

Azure Credits

Azure Subscription + Azure Functions 

Develop PowerApps, Azure Functions and Flow

https://docs.microsoft.com/en-us/azure/azure-functions/functions-create-first-azure-function
https://collab365.community/how-to-use-microsoft-powerapps/
http://blog.sharedove.com/adisjugo/index.php/2018/11/29/extending-powerapps-and-flow-part-1-adding-custom-data-sources-through-azure-api-apps/

Check my Office 365 Developer Subscription Status:

O365 Developer Dashboard


Also, when adding licenses,

Understand what happens when you assign a license to someone

The following table lists what automatically happens when you assign a license to someone:

If the subscription has this service
This automatically happens

Exchange Online
A mailbox is created for that person.

SharePoint Online
Edit permissions to the default SharePoint Online team site are assigned to that person.

Skype for Business Online
The person will have access to the features associated with the license.

Office 365 ProPlus
The person will be able to download Microsoft Office on up to 5 Macs or PCs, 5 tablets, and 5 smartphones.


Office 365 Business:

See here more info

https://docs.microsoft.com/en-us/office365/servicedescriptions/office-365-platform-service-description/office-365-plan-options

Tuesday, May 14, 2019

Windows Startup Location Order : Windows Application Startup locations


List of registry keys that can start a program when Windows boots. Applies to Windows 9x thru Win10, see reference articles here and here


I. Windows Boot Device Drivers

These drivers are loaded first as they are required for the proper operation of hardware such as storage devices. Boot device drivers will be located under the following key and have a Startvalue equal to 0.

Registry Keys:

HKEY_LOCAL_MACHINE\System\CurrentControlSet\Services

1 )Windows will now perform various tasks

2) start the Winlogon process.

3) Then starts the service control manager that loads services & drivers that are set for auto-start.

Windows Auto-start Services & Drivers –The (SCM) process (\Windows\System32\services.exe), will now launch any services or drivers that are marked with a Start value of 2.

Registry Keys:

HKEY_LOCAL_MACHINE\System\CurrentControlSet\Services

II. RunServicesOnce

- This key is designed to start services when a computer boots up. These entries may continue running even after you log on, but must be completed before the

HKEY_LOCAL_MACHINE\...\RunOnce registry can start loading its programs.

Registry Keys:

HKEY_LOCAL_MACHINE\Software\Microsoft\Windows\CurrentVersion\RunServicesOnce

HKEY_CURRENT_USER\Software\Microsoft\Windows\CurrentVersion\RunServicesOnce

II. RunServices

- This key is designed to start services as well. These entries can also continue running even after you log on, but must be completed before the HKEY_LOCAL_MACHINE\...\RunOnce registry can start loading its programs.

Registry Keys:

HKEY_LOCAL_MACHINE\Software\Microsoft\Windows\CurrentVersion\RunServices

HKEY_CURRENT_USER\Software\Microsoft\Windows\CurrentVersion\RunServices

The Windows logon prompt is shown on the Screen. After a user logs in the rest of the keys continue.

Notify - This key is used to add a program that will run when a particular event occurs. Events include logon, logoff, startup, shutdown, startscreensaver, and stopscreensaver. When Winlogon.exe generates an event such as the ones listed, Windows will look in the Notify registry key for a DLL that will handle this event. Malware has been known to use this method to load itself when a user logs on to their computer. Loading in such a way allows the malware program to load in such a way that it is not easy to stop.

Registry Key:

HKEY_LOCAL_MACHINE\SOFTWARE\Microsoft\Windows NT\CurrentVersion\Winlogon\Notify

III. UserInit Key

- This key specifies what program should be launched right after a user logs into Windows. The default program for this key is C:\windows\system32\userinit.exe. Userinit.exe is a program that restores your profile, fonts, colors, etc for your user name. It is possible to add further programs that will launch from this key by separating the programs with a comma. For example:

HKLM\Software\Microsoft\Windows NT\CurrentVersion\Winlogon\Userinit =C:\windows\system32\userinit.exe,c:\windows\badprogram.exe.

This will make both programs launch when you log in and is a common place for trojans, hijackers, and spyware to launch from.

Registry Key:

HKEY_LOCAL_MACHINE\Software\Microsoft\Windows NT\CurrentVersion\Winlogon\Userinit

IV. Shell Value

- This value contains a list of comma separated values that Userinit.exe will launch. The default shell for Windows is explorer.exe, though there are legitimate replacements that have been made. When userinit.exe starts the shell, it will first launch the Shell value found in HKEY_CURRENT_USER. If this value is not present, it will then launch the value found in HKEY_LOCAL_MACHINE.

Registry Key:

HKEY_CURRENT_USER\Software\Microsoft\Windows NT\CurrentVersion\Winlogon\\Shell

HKEY_LOCAL_MACHINE\Software\Microsoft\Windows NT\CurrentVersion\Winlogon\\Shell

The rest of the Autostart locations will now be processed.

V. RunOnce Local Machine Key

- These keys are designed to start programs synchronously  for current machine or user. Entries in these keys are started once The RunOnce keys may be ignored in Safe Mode depending on OS version.

Registry Keys:

HKEY_LOCAL_MACHINE\Software\Microsoft\Windows\CurrentVersion\RunOnce

HKEY_LOCAL_MACHINE\Software\Microsoft\Windows\CurrentVersion\RunOnceEx

Windows 10 : Run keys (machine, all users)

  • HKLM\SOFTWARE\Microsoft\Windows\CurrentVersion\Run
  • HKLM\SOFTWARE\Wow6432Node\Microsoft\Windows\CurrentVersion\Run (only on 64-bit systems)
  • HKLM\Software\Microsoft\Windows\CurrentVersion\RunOnce (runs the program/command only once, clears it as soon as it is run)
  • HKLM\Software\Microsoft\Windows\CurrentVersion\RunOnceEx (runs the program/command only once, clears it as soon as execution completes)
  • HKLM\System\CurrentControlSet\Services
  • HKLM\Software\Microsoft\Windows\CurrentVersion\RunServices
  • HKLM\Software\Microsoft\Windows\CurrentVersion\RunServicesOnce
  • VI. Run

    - These are the most common startup locations for programs to install auto start from. By default these keys are not executed in Safe mode. If you prefix the value of these keys with an asterisk, *, it will run in Safe Mode.

    Registry Keys:

    HKEY_LOCAL_MACHINE\Software\Microsoft\Windows\CurrentVersion\Run

    HKEY_CURRENT_USER\Software\Microsoft\Windows\CurrentVersion\Run

    Windows 10 : Run keys (individual user)

  • HKCU\SOFTWARE\Microsoft\Windows\CurrentVersion\Run
  • HKCU\SOFTWARE\Wow6432Node\Microsoft\Windows\CurrentVersion\Run (only on 64-bit systems)
  • HKCU\Software\Microsoft\Windows NT\CurrentVersion\Windows\Run
  • HKCU\Software\Microsoft\Windows\CurrentVersion\RunOnce (runs the program/command only once, clears it as soon as it is run)
  • HKCU\Software\Microsoft\Windows\CurrentVersion\RunOnceEx (runs the program/command only once, clears it as soon as execution completes)
  • HKCU\Software\Microsoft\Windows\CurrentVersion\RunServices
  • HKCU\Software\Microsoft\Windows\CurrentVersion\RunServicesOnce
  • VII & VIII. All Users & Current User Startup Folders

    Windows XP, NT, 2000:

    Autostart folder of the current user

    Win 9X, ME
    c:\windows\start menu\programs\startup

    Windows XP
    C:\Documents and Settings\LoginName\Start Menu\Programs\Startup

    Autostart folder of all users

    Windows XP
    C:\Documents and Settings\All Users\Start Menu\Programs\Startup

    Windows NT
    C:\wont\Profiles\All Users\Start Menu\Programs\Startup

    Windows 2000
    C:\Documents and Settings\All Users\Start Menu\Programs\Startup

    Windows 10:

    Autostart folder of the current user

  • shell:startup
  • %appdata%\Microsoft\Windows\Start Menu\Programs\Startup
  • C:\Users\USERNAME\AppData\Roaming\Microsoft\Windows\Start Menu\Programs\Startup
  • Autostart folder of all users

  • shell:common startup
  • %programdata%\Microsoft\Windows\Start Menu\Programs\Startup
  • C:\ProgramData\Microsoft\Windows\Start Menu\Programs\StartUp


  • IX. RunOnce Current User Key -

    These keys are designed to be used primarily by Setup programs. Entries in these keys are started once and then are deleted from the key. If there is an exclamation point preceding the value of the key, the entry will not be deleted until after the program completes, otherwise it will be deleted before the program runs. This is important, because if the exclamation point is not used, and the program referenced in this key fails to complete, it will not run again as it will have already been deleted. The RunOnce keys are ignored under Windows 2000 and Windows XP in Safe Mode. The RunOnce keys are not supported by Windows NT 3.51.

    Registry Key:

    HKEY_CURRENT_USER\Software\Microsoft\Windows\CurrentVersion\RunOnce


    X. Explorer Run

    - These keys are generally used to load programs as part of a policy set in place on the computer or user.

    Registry Keys:

    HKEY_LOCAL_MACHINE\Software\Microsoft\Windows\CurrentVersion\Policies\Explorer\Run

    HKEY_CURRENT_USER\Software\Microsoft\Windows\CurrentVersion\Policies\Explorer\Run

    Load Key - This key is not commonly used anymore, but can be used to auto start programs.

    Registry Key:

    HKEY_CURRENT_USER\Software\Microsoft\Windows NT\CurrentVersion\Windows\load

    AppInit_DLLs - This value corresponds to files being loaded through the AppInit_DLLs Registry value. The AppInit_DLLs registry value contains a list of dlls that will be loaded when user32.dll is loaded. As most Windows executables use the user32.dll, that means that any DLL that is listed in the AppInit_DLLs registry key will be loaded also. This makes it very difficult to remove the DLL as it will be loaded within multiple processes, some of which can not be stopped without causing system instability. The user32.dll file is also used by processes that are automatically started by the system when you log on. This means that the files loaded in the AppInit_DLLs value will be loaded very early in the Windows startup routine allowing the DLL to hide itself or protect itself before we have access to the system.

    Registry Key:

    HKEY_LOCAL_MACHINE\Software\Microsoft\Windows NT\CurrentVersion\Windows

    ShellServiceObjectDelayLoad - This Registry value contains values in a similar way as the Run key does. The difference is that instead of pointing to the file itself, it points to the CLSID's InProcServer, which contains the information about the particular DLL file that is being used.

    The files under this key are loaded automatically by Explorer.exe when your computer starts. Because Explorer.exe is the shell for your computer, it will always start, thus always loading the files under this key. These files are therefore loaded early in the startup process before any human intervention occurs.

    Registry Key:

    HKEY_LOCAL_MACHINE\SOFTWARE\Microsoft\Windows\CurrentVersion\ShellServiceObjectDelayLoad

    SharedTaskScheduler - This section corresponds to files being loaded through the SharedTaskScheduler registry value for XP, NT, 2000 machines. The entries in this registry value run automatically when you start windows.

    Registry Key:

    HKEY_LOCAL_MACHINE\SOFTWARE\Microsoft\Windows\CurrentVersion\Explorer\SharedTaskScheduler


    Tuesday, May 7, 2019

    GMail sample filter using OR and AND logical operators

    I had a need to filter all emails coming from autotrader or cargurus or autolist and I wanted the emals be placed moved into a label of my choosing. To achieve this we can use the following Search. We can then save this Search as a Filter/ The Filter then will have an action to move emails that match this criteria to a label.

    • - To use OR operator: simply type OR or a | (pipe char) blank space

    subject:(Best OR Vimeo)

    subject:(Best | Vimeo)

    • - To use AND operator: type AND

    subject:(Now AND Vimeo)

    So lets build the search,

    1) Get your search right:

    from:(*autolist.com | *autotrader.com | *cargurus.com)

    2) Now build the filter, here is a screen recording of how I did this

    Finished Example See here

    Here are some great links with examples:

    https://emailanalytics.com/25-gmail-search-operators-that-will-make-you-a-gmail-pro/

    https://digitalinspiration.com/gmail-search-4355

    https://webapps.stackexchange.com/questions/92004/how-to-use-or-operator-in-gmail

    Monday, April 29, 2019

    SharePoint : Create a button or link in a list that can Check Workflow Status or Start an MS Flow

    1. Create link on List to check Workflow Status (OnPrem SP2010/2013 & SPO ModernUI)

    Example of link column on list to view Workflow Status: View Example of link to Workflow Status:

    SPO Modern UI:

    SharePoint Column Formatting ModernUI : column formatting to customize SharePoint

    0. Get GUID of list :

    e.g: 8B418B49-95E8-4851-9CBB-F04542182AB5

    1. Add Column,

    e.g: See Here

    2. Set Column Customization: e.g:

    SPO: COLUMN Customizations Cool!

    {

    "$schema": "https://developer.microsoft.com/json-schemas/sp/column-formatting.schema.json",

    "elmType": "a",

    "txtContent": "@currentField",

    "attributes": {

    "target": "_blank",

    "href": "='[YourSite]/_layouts/15/Workflow.aspx?List={8B418B49-95E8-4851-9CBB-F04542182AB5}&ID=' + [$ID]"

    }

    }

    3. View List

    OnPrem

    0. Get GUID of list :

    e.g: 8B418B49-95E8-4851-9CBB-F04542182AB5

    1. Calculated Column:

    e.g: See here

    2. Apply Formula:

    ="https://smhi365.sharepoint.com/sites/MigrationTest/_layouts/15/Workflow.aspx?List={8B418B49-95E8-4851-9CBB-F04542182AB5}&ID="&ID

    2. Create a buttin to start an MS Flow:

    Example showing button and link:

    More Details Here:

    https://wonderlaura.com/2018/07/18/button-in-sharepoint-list-to-trigger-microsoft-flow/

    Thursday, April 25, 2019

    Check .Net Framework Version on any Windows Machine

    1. Open the command prompt (i.e Windows + R → type "cmd").
    2. Type the following command, all on one line: This will list all the .NET versions.

    reg query "HKEY_LOCAL_MACHINE\SOFTWARE\Microsoft\NET Framework Setup\NDP"

    Results: http://prntscr.com/ngyyuz


    1. To get the latest .NET 4 version; Type following cmd, on a single line:

    reg query "HKEY_LOCAL_MACHINE\SOFTWARE\Microsoft\NET Framework Setup\NDP\v4\full" /v version

    results: http://prntscr.com/ngyyxn

    Tuesday, April 16, 2019

    Powershell + Windows Service : Disable and Stop a Service if it is Enabled and Running.

    1. Create Script

    2. Create bat file to call Script

    3.Schedule Windows task to invoke bat file every (n) minutes

    Name: AutoStopStartService.ps1

    In my case I am stopping Windows Update, since Win10 likes to restart/re-enable Windows Update it seems every day atleast, even if the Admin disables it!

    1. Script: see here

    param (

    [string]$service = $(throw "-service is required.")

    )

    write-output 'AutoStopStartService()-> START, svc is $service'

    # get service

    $ServiceName = $service

    $arrService = Get-Service -Name $ServiceName

    # get start mode

    write-output $arrService.Status

    $stu = Get-WmiObject -Class Win32_Service -Property StartMode -Filter "Name='$service'" | Select StartMode;

    # if not Disabled, Disable it

    if ($stu -NotMatch 'Disabled')

    {

    write-output 'AutoStopStartService()-> DISABLE it!'

    Start-Sleep -seconds 10

    set-service $ServiceName -startuptype disabled

    }

    # if Running, Stop it

    if ($arrService.Status -ne 'Running')

    {

    write-output 'AutoStopStartService()-> Service already stopped!'

    }

    else

    {

    write-output 'AutoStopStartService()-> STOP IT!'

    Stop-Service $ServiceName

    Start-Sleep -seconds 10

    $arrService.Refresh()

    Write-Host 'Service NEW STATUS-> ' $arrService.Status

    }

    # done

    write-output 'AutoStopStartService()-> DONE'

    Exit


    2. Create bat file to call Script

    powershell .\AutoStopStartService.ps1 -service wuauserv -WindowStyle Hidden

    3.Windows Task: Schedule to invoke bat file every (n) minutes

    See here

    Sunday, March 24, 2019

    Customize Find in Files Find Results format of results

    So Im using VS 2017, find in files, the Find Results is displaying an awful long result for each file name found as the result of a search. This makes it difficult to quickly ascertain the fie name. Previous versions of VS by default displayed the file name, it seems (for me atleast) that VS 2017 is displaying the Full name in Find Results. See example here


    To resolve we would like to view FileName or relative full name in the Find Results.
    To do this, we need to implement a per version solution for VS:

    >= VS 2017

    • Close Visual Studio 2017
    • Open regedit
    • Open bin file:
    "C:\Users\[userName]\AppData\Local\Microsoft\VisualStudio\15.0_f294cc8e\privateregistry.bin"
    • Select HKEY_LOCAL_MACHINE from the left bar
    • Select File > Load Hive...
    • Load the privateregistry.bin file from %localappdata%\Microsoft\VisualStudio\15.0_[instanceid]{RootSuffix}\privateregistry.bin. The RootSuffix for a normal VS installation will be blank. This is mostly used for the experimental instance
    • Name the key whatever you want (e.g. "VS2017") when prompted
    • From there, you should be able to view the entries just like any normal registry.
    • Customize it according to accepted answer's suggestions.
    • Once you're finished, you need to make sure that you "Unload" the private registry, by selecting the "root" key ("VS2017" in this example) and selecting File > Unload Hive . If you don't do this, VS won't be able to read the privateregistry.bin file when it runs, causing major problems
    < VS 2017
    Using regedit:
    See article Customize how Find in Files results are displayed in the Find Results Window:
    Example here


    Format specifiers:
    Files
    • $p - path
    • $f - filename
    • $v - drive/unc share
    • $d - dir
    • $n - name
    • $e - .ext
    Location
    • $l - line
    • $c - col
    • $x - end col if on first line, else end of first line
    • $L - span end line
    • $C - span end col
    Text
    • $0 - matched text
    • $t - text of first line
    • $s - summary of hit
    • $T - text of spanned lines
    Char
    • \n - newline
    • \s - space
    • \t - tab
    • \\ - slash
    • \$ - $

    IE 11 and SharePoint Detect Compatibility Mode

    Strange but true:

    Identifying compatibility view in IE11 without the use of Developer tools (F12)

    It’s possible to parse used IE version and its mode from User Agent string. And you don’t even have to do that yourself: there’s actually a small JavaScript-library called IE-truth, that does this for you. You can find it here: https://github.com/Gavin-Paolucci-Kleinow/ie-truth


    Using this library, you can implement something like this in the script editor web part in SharePoint:

    <span id="browserVersion"></span>
    <script src="//cdn.rawgit.com/Gavin-Paolucci-Kleinow/ie-truth/master/ie-truth.js" type="text/javascript"></script>   <script type="text/javascript">// < ![CDATA[
    // < ![CDATA[
    var IE = IeVersion();
    var elem = document.getElementById("browserVersion");
    elem.innerHTML = "Is your browser using compatibility mode: " + IE.CompatibilityMode;
    // ]]>
    </script>

    Full Source of source script as of 201903:

    function IeVersion() {
        //Set defaults
        var value = {
    		IsIE: false,
    		IsEdge: false,
    		EdgeHtmlVersion: 0,
    		TrueVersion: 0,
    		ActingVersion: 0,
    		CompatibilityMode: false
    	};   //Try to find the Trident version number
    	var trident = navigator.userAgent.match(/Trident\/(\d+)/);
    	if (trident) {
    		value.IsIE = true;
    		//Convert from the Trident version number to the IE version number
    		value.TrueVersion = parseInt(trident[1], 10) + 4;
    	}   //Try to find the MSIE number
    	var msie = navigator.userAgent.match(/MSIE (\d+)/);
    	if (msie) {
    	    value.IsIE = true;
            	//Find the IE version number from the user agent string
    		value.ActingVersion = parseInt(msie[1]);
    	} else {
    		//Must be IE 11 in "edge" mode
    		value.ActingVersion = value.TrueVersion;
    	}   //If we have both a Trident and MSIE version number, see if they're different
    	if (value.IsIE &amp;&amp; value.TrueVersion &gt; 0 &amp;&amp; value.ActingVersion &gt; 0) {
    		//In compatibility mode if the trident number doesn't match up with the MSIE number
    		value.CompatibilityMode = value.TrueVersion != value.ActingVersion;
    	}   //Try to find Edge and the EdgeHTML vesion number
    	var edge = navigator.userAgent.match(/Edge\/(\d+\.\d+)$/);
    	if (edge)
    	{
    		value.IsEdge = true;
    		value.EdgeHtmlVersion = edge[1];
    	}
    	return value;
    }

    Friday, March 15, 2019

    Delete Directory Results in error File Path is “is too long.”

    We receive the below error when runing a rmdir or manual delete:


    Workaround #1:
    Download 7Zip:
    1. Download and install the latest stable build of 7zip.
    2. Run the 7zip File Manager (7zfm.exe).
    3. In the 7zip File Manager, navigate so that you can see the name of the folder you want to delete (i.e. you're in the parent folder).
    4. Hold the Shift button down.
    5. Click the "Delete" button, either on your keyboard or in the 7zip File Manager toolbar; make sure you're still holding the Shift key down.
    6. Click the "OK" button; make sure you're still holding the Shift key down.


    Workaround #2:
    Download FastCopy:
    Use the Delete function:


    Tuesday, March 12, 2019

    Windows 10 Power Management Tab is missing and Bluetooth

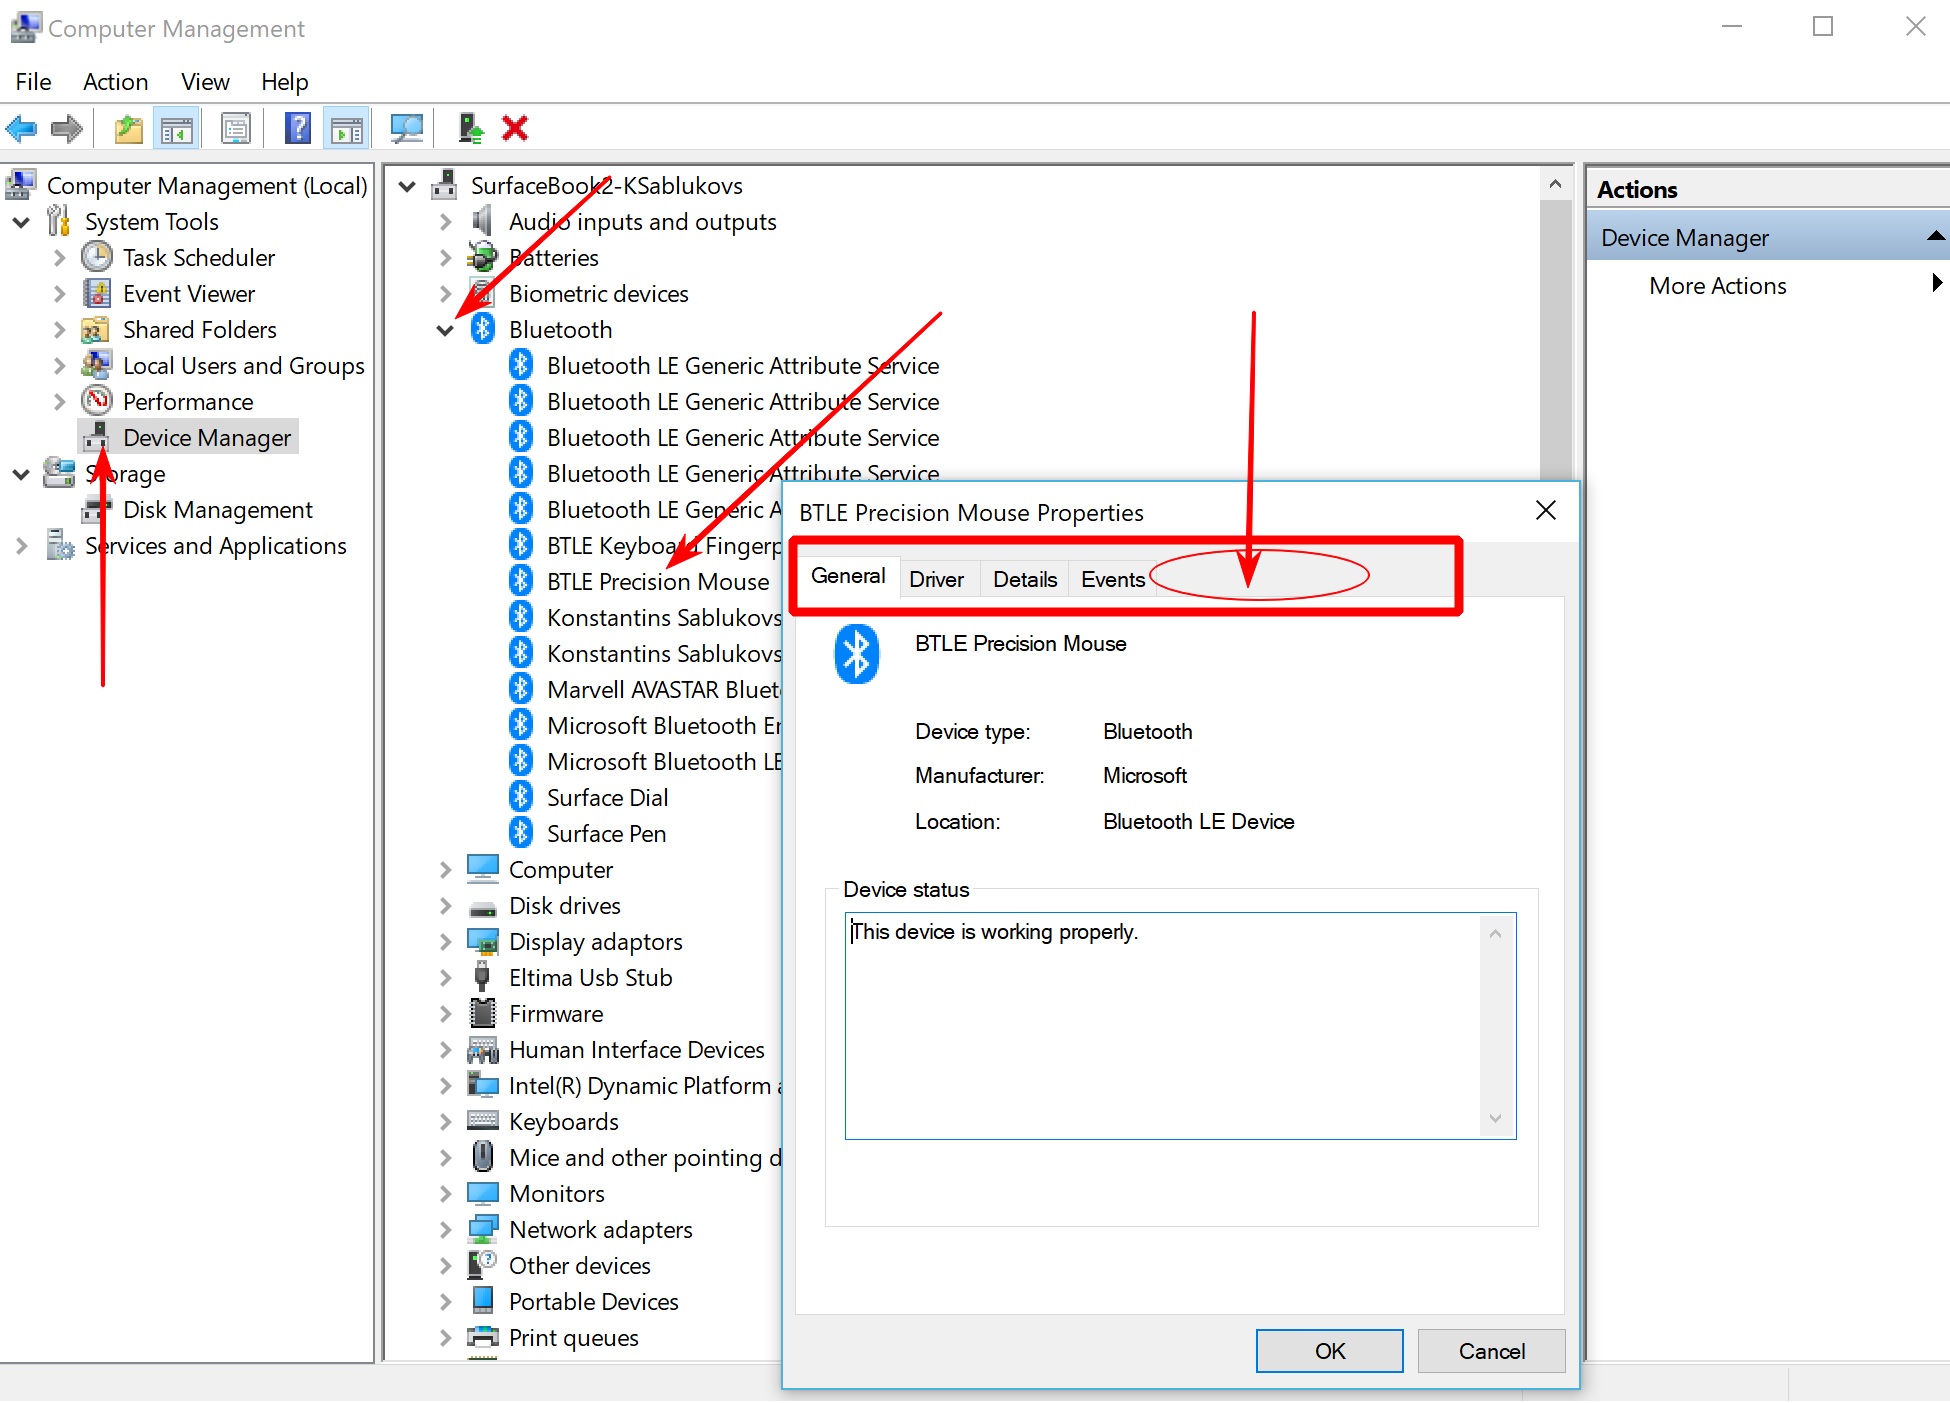
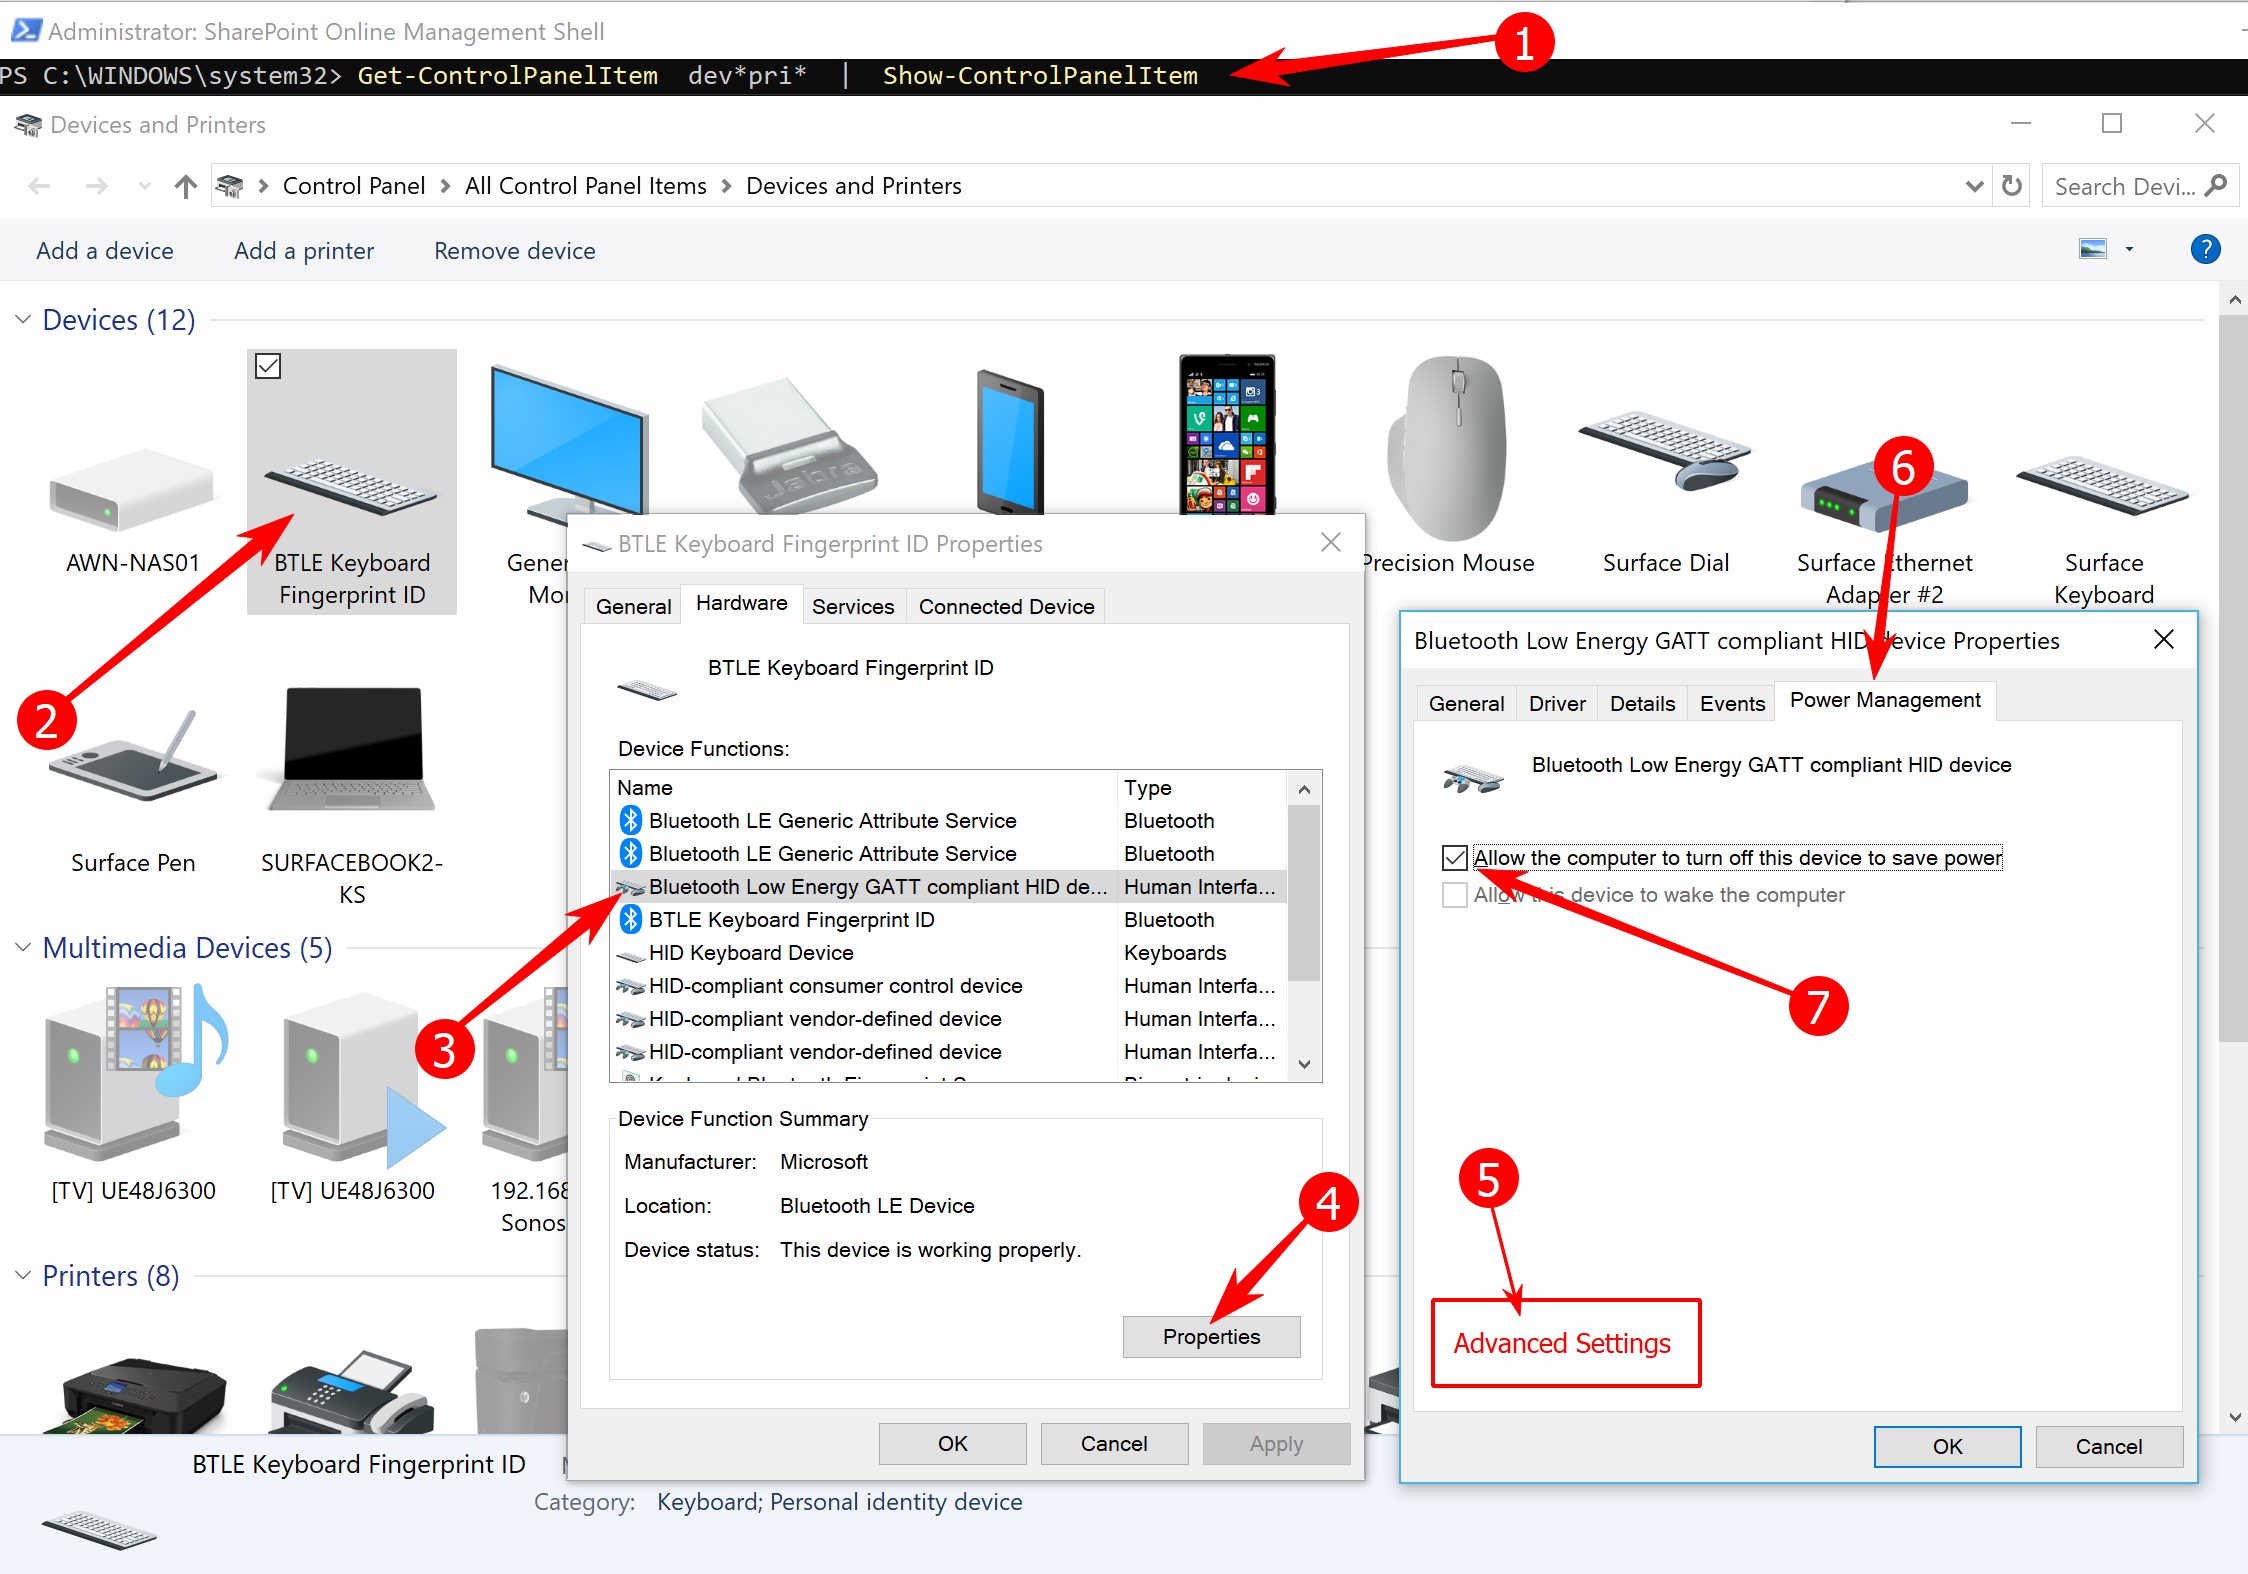
    IF you have issues with a bluetooth mouse or keyboard dropping connection or does not connect when computer awakes / reboots, then the below info will assist. When this issue occurs, most white papers direct us to update the Power Management tab for Bluetooth drivers associated with the peripheral. However starting somewhere around build 1700 or 1800 of Win 10 the Power Management tab is missing from the driver prop tabs. Thus we need a reg hack to bring back the Power Management tab;  Now we can adjust the Power Management  settings associated with the specific BT driver for the peripheral, in my case a Logitech Ultra Thin Mouse

    View Power Management Tab in device manager when it is (hidden) See below:

    Image

    1) create a reg key and set value to 0

    Open RegEdit and move to HKEY_LOCAL_MACHINE\SYSTEM\CurrentControlSet\Control\Power

    If it's not created : create new DWORD key,  name = CsEnabled , value= 0.

    Restart the machine, now check the driver. To view a driver for a specific peripheral the below screenshot show step by step :


    Monday, February 25, 2019

    SharePoint Online Tuning Web Page

    SharePoint Online Tune Web Page

    Per:

    https://sharepointinterface.com/2017/07/07/the-five-minute-page-performance-troubleshooting-guide-for-sharepoint-online/


    Network Trace:


    • SPIisLatency. This is a measure of the amount of time (in milliseconds) that the request spent queued and waiting to be processed by IIS (Internet Information Services – the web server). Ideally, it should be zero or very close to zero. In my example, the SPIisLatency is 3ms.
    • SPRequestDuration. This is the amount of time (again, in milliseconds) that it took to process the request on the server. Basically, this is the end-to-end processing time for the page. Healthy pages range from a couple hundred milliseconds to around a second depending on the content of the page. In my example, the SPRequestDuration is 249ms.
    • X-SharePointHealthScore. This is the value, from zero to ten, that indicates how heavily loaded the SharePoint Server is at the time when the page was served. A score of zero means the server is not under load, while a score of ten means the server is overloaded. As the X-SharePointHealthScore goes up, the server begins to selectively suspend work designated as “low priority,” like some Timer Service jobs, Search requests, and various other low-priority tasks. ideally, this value should be zero – or close to it. In my example, the value is zero. For example see here

    Saturday, February 2, 2019

    SharePoint Online: Using PnP to Manage Recycle Bin

    #Get-Module SharePointPnPPowerShell* -ListAvailable | Select-Object Name,Version | Sort-Object Version -Descending
    # Connect-PnPOnline –Url https://mysite-admin.sharepoint.com –UseWebLogin
    # Get-PnPTenant

    Connect-PnPOnline -Url https://mysite.sharepoint.com/engineering –UseWebLogin

    $now = (Get-Date)

    Write-Host "ManageRecycleBin.Restore() : START at: " (Get-Date)


    $currentSubwebs = Get-PnPSubwebs

    Write-Host "Web Count: " $currentSubwebs.Count

    #set the restore date to yesterday
    $today = (Get-Date)
    $restoreDate = $today.date.AddDays(-18)

    #Write-Host "RecycleBin.Count: " (Get-PnPRecycleBinItem).count
    Write-Host "restoreDate: " $restoreDate

    #(Get-PnPRecycleBinItem).count

     
    #get all items that are deleted yesterday or today, select the last 10 items and display a list with all properties
      # Get-PnPRecycleBinItem | ? DeletedDate -gt $restoreDate | select -last 10 | fl *


    #Filter by Date
    #$today = (Get-Date)
    # $date1 = $today.date.addDays(-4)
    #$date2 = $today.date.addDays(-6)
    # DOES NOT WORK : DeletedDate : The term 'DeletedDate' is not recognized as the name of a cmdlet, function, script file, or operable program
    #Get-PnPRecycleBinItem | Where-Object { DeletedDate -gt $date2 -and DeletedDate -lt $date1}  | select -last 10 | fl *


    #Filter on user
    #$Get-PnPRecycleBinItem -FirstStage | ? DeletedByEmail -eq 'john@contoso.com'

    #Filter on file type
    # Get-PnPRecycleBinItem -FirstStage | ? LeafName -like '*.docx'

    #Export results to CSV
    # Get-PnPRecycleBinItem | ? {$_.DeletedDate -gt $restoreDate -and $_.DeletedByEmail -eq 'john@contoso.com'} | Export-Csv c:\temp\restore.csv

    #Restoring the files
    # Get-PnPRecycleBinItem -firststage | ? {$_.DeletedDate -gt $restoreDate -and $_.DeletedByEmail -eq 'john@contoso.com'} | Restore-PnpRecycleBinItem -Force


    #Filter on file type
    #Get-PnPRecycleBinItem | ? DirName -like '*engineering/*'  | select -last 10 | fl *

    Write-Host "Get-PnPRecycleBinItem:START... " (Get-Date)
    #Get-PnPRecycleBinItem | ? {$_.DeletedDate -gt $restoreDate -and $_.DirName -like '*engineering/Active Projects/*'} | select -last 10 | fl *
    Get-PnPRecycleBinItem | ? {$_.DeletedDate -gt $restoreDate -and $_.DirName -like '*engineering/Active Projects/*'} | Export-Csv C:\temp\20190202.00.csv

    #Get-PnPRecycleBinItem | ? {$_.DeletedDate -gt $restoreDate -and $_.DeletedByEmail -eq 'john@contoso.com'} | select -last 10 | fl *

    # ERROR below,
    #Get-PnPRecycleBinItem | ? DeletedDate -gt $restoreDate -and DirName -like '*engineering/*' | select -last 10 | fl *
    #Get-PnPRecycleBinItem | Where-Object { DeletedDate -gt $restoreDate -and DirName -like '*engineering/*'}  | select -last 10 | fl *
    Write-Host "Get-PnPRecycleBinItem:START... " (Get-Date)


    Write-Host "ManageRecycleBin.Restore() : DONE at: " (Get-Date)

    Thursday, January 10, 2019

    Should I run 64-bit vs 32-bit PowerShell on Windows OS 64bit?

    1. it matters is when PowerShell needs to talk to or use something outside itself. When that happens, the versions have to match.

    2. if you are running 32-bit PowerShell and you try to use a module that calls a 64-bit .dll, it will fail. Or if you are running 64-bit PowerShell and you try to create a 32-bit COM object, it will fail

    How to detect which Bit is available:

    See here|