Showing posts with label Windows. Show all posts

Wednesday, June 24, 2026

Stop the High CPU & Disk Usage by CompatTelRunner.exe!


This process  CompatTelRunner.exe is a process that is used to upgrade your system to the latest OS version or other Service Pack upgrades. It is also used to perform diagnostics on your computer to determine if there is the possibility of compatibility issues and collects program telemetry information if opted-in to the Microsoft Customer Experience Improvement Program. It allows Microsoft to ensure compatibility when you want to install the latest version of Windows OS. 
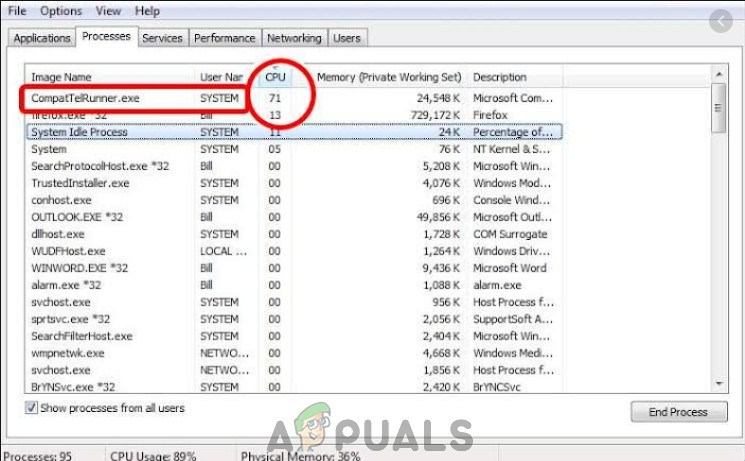
CompatTelRunner.exe

is part of a Windows Update, specifically the KB2977759 one, which stands as the Compatibility update for Windows 7 RTM (Release to Manufacturer). The update is one of the many that serve as a preparation to upgrade to the latest OS version, and will

This process takes up storage bandwidth which may slow down your PC, and you will most likely want to get rid of it. Users complained of multiple CompatTellRunner.exe files showing up in the Task Manager consuming CPU and Disk Usage.

Though this process isn’t really necessary and can be deleted. If you do want Microsoft to diagnose your system by itself and run the compatibility checks, then let it run. This can be a privacy concern for some.

The CompatTelRunner.exe file is located in the System32 folder and is owned by the TrustedInstaller any modifications you try to do to it will be met with an “Access is denied” error, which means that you can’t modify or delete it in any way. This is because the process is owned by TrustedInstaller, and everything else only has Read-Only permission over it and you can’t modify it.

There is a solution for the issue, and it involves taking ownership of the process, after which you can delete it without deleting the entire Windows update and save yourself from problems OR you can let the program stay, and just disable Scheduled Tasks which launches the program.

Method 1: Take Ownership And Then Delete the CompatTellRunner.exe

The process is a fairly straightforward one, but make sure not to skip steps and keep in mind that you should be logged in as an administrator. First of all, open your Start menu by pressing the Windows key on your keyboard, or by clicking the Windows icon at the end of the taskbar.

Type compattelrunner.exe in the search box, but don’t open the result, which is a file named compattelrunner, and instead right-click on it and select Open file location from the dropdown menu
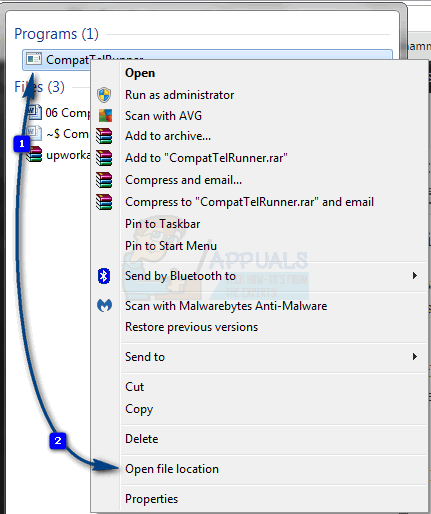
2016-08-23_225202
Open File Location

OR Hold the Windows Key and Press R. Type C:\Windows\System32 and type CompatTelRunner.exe in the search bar on the top right.
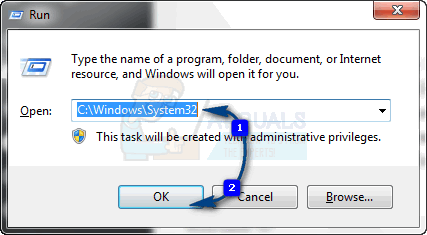
2016-08-23_225310
Open System32 Folder

Once inside the folder, right-click the Compattelrunner.exe file within it, and select Properties from the menu. In the window that opens, you will notice a Security tab, select it and click on the Advanced button inside. Once the window opens, find the Owner tab, and select Change owner. This will give you a list of new owners, after which you should select the account you are using, and click Apply. You will be met with a prompt that warns you to close all Properties windows that are currently open to change the ownership, so close them.

When you’ve changed the owner of the file, next you should change the permissions. To do that, right-click the Compattelrunner.exe file again, and open Properties. Go to the Security tab and click Advanced once again. Within the window, select Permissions, and from the list that pops out, select the account you are using. You will see a new window with options about the permissions. At the top, under the Allow column, select Full Control and click Apply.

When you’re done with this, you are the owner of the file, not TrustedInstaller, and you have full control over it, meaning you can delete it without being met with the Access is denied error. Feel free to do so, and you won’t see it taking over much-needed resources from your system.

Take Ownership of the File

While there are some solutions you might run into that will tell you to delete the entire update, KB2977759, doing so is not a smart idea as this will mess with the entire schedule of Windows Updates, and you might have bigger issues in the future. Follow the aforementioned steps to safely delete the file and you will have your computer running again in no time.

PRO TIP: If the issue is with your computer or a laptop/notebook you should try using Fortect Repair which can scan the repositories and replace corrupt and missing files. This works in most cases, where the issue is originated due to a system corruption. You can download Fortect by Clicking Here

Method 2: Disable CompatTelTunner.exe from Task Scheduler

Hold the Windows Key and Press R. Type taskschd.msc and click OK.


Open taskschd.msc

Expand Task Scheduler Library -> Microsoft -> Windows -> Application Experience


Open Application Experience Experience

Right-click on any of the tasks listed as Microsoft Compatibility Appraiser and choose Disable.
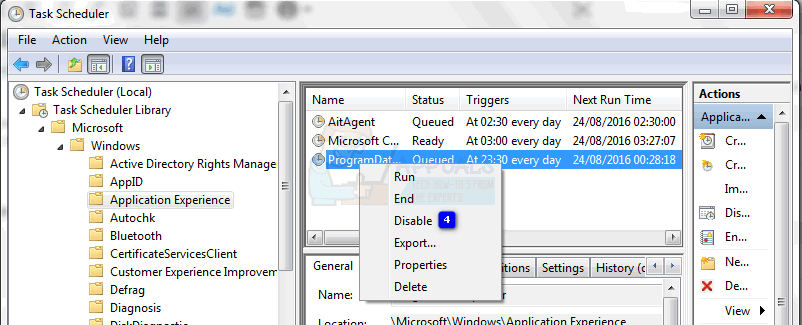
2016-08-23_224621
Disable Microsoft Compatibility Appraiser Tasks

Method 3: Switch Feedback and Diagnostics to Basic

CompatTelRunner.exe uses the Feedback and Diagnostics data to update your system to the latest version. If Feedback and Diagnostics setting is enabled fully, then CompatTelRunner.exe may use excessive system resources. In that case, changing Feedback and Diagnostics settings to basic may solve the problem.

  1. Press the Windows button, type “Feedback & Diagnostics.
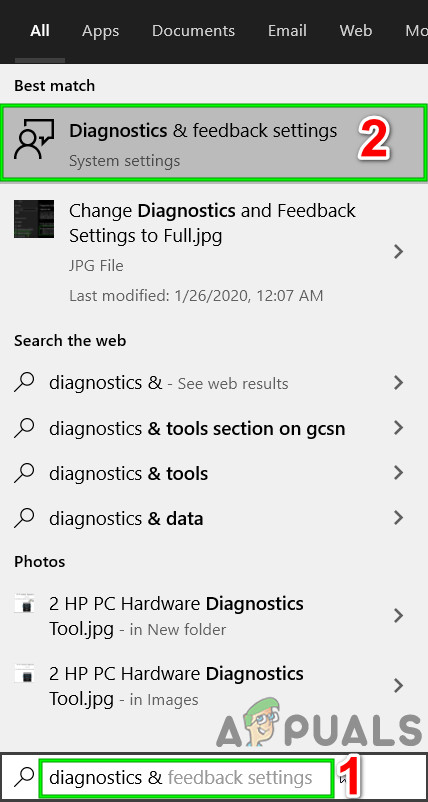
    Open Diagnostics & Feedback Settings
  2. Now in the right pane of the window, select “Basic“.
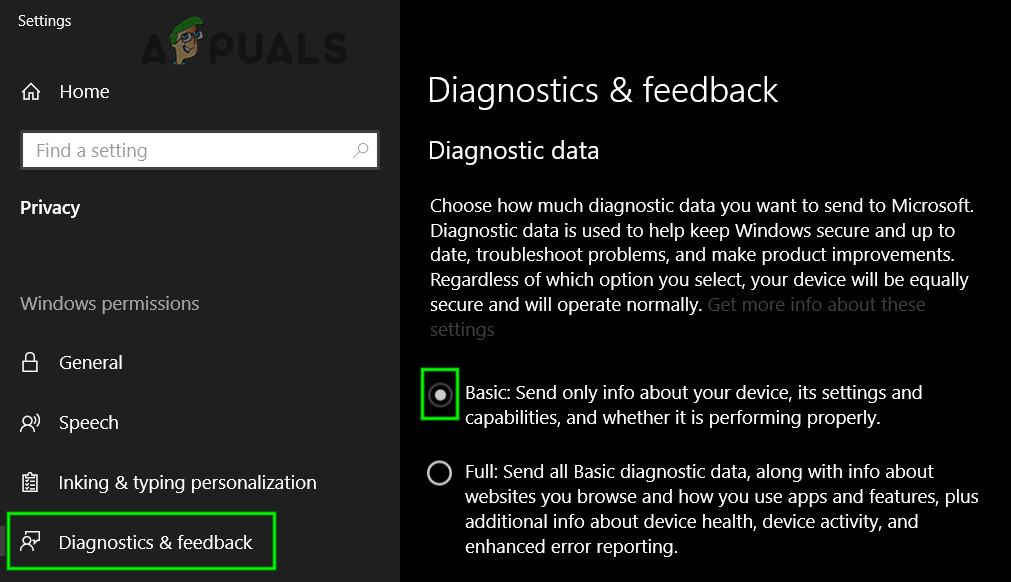
    Change Diagnostics & Feedback to Basic
  3. Now restart the system and check if your system’s usage has decreased.

Method 4: Disable Connected User Experiences and Telemetry Service

Previously called Diagnostics Tracking or DiagTracK, now called “Connected User Experiences and Telemetry“, is a Windows service that runs in the background to automatically send data to Microsoft. This service is responsible for the transmission of diagnostic and usage information to Microsoft. Disabling this service may solve the problem of high CPU usage.

  1. Press Run, services.msc
    Open Services
  2. In the Services window, find and right-click Connected User Experiences and Telemetry service and then click on Properties.
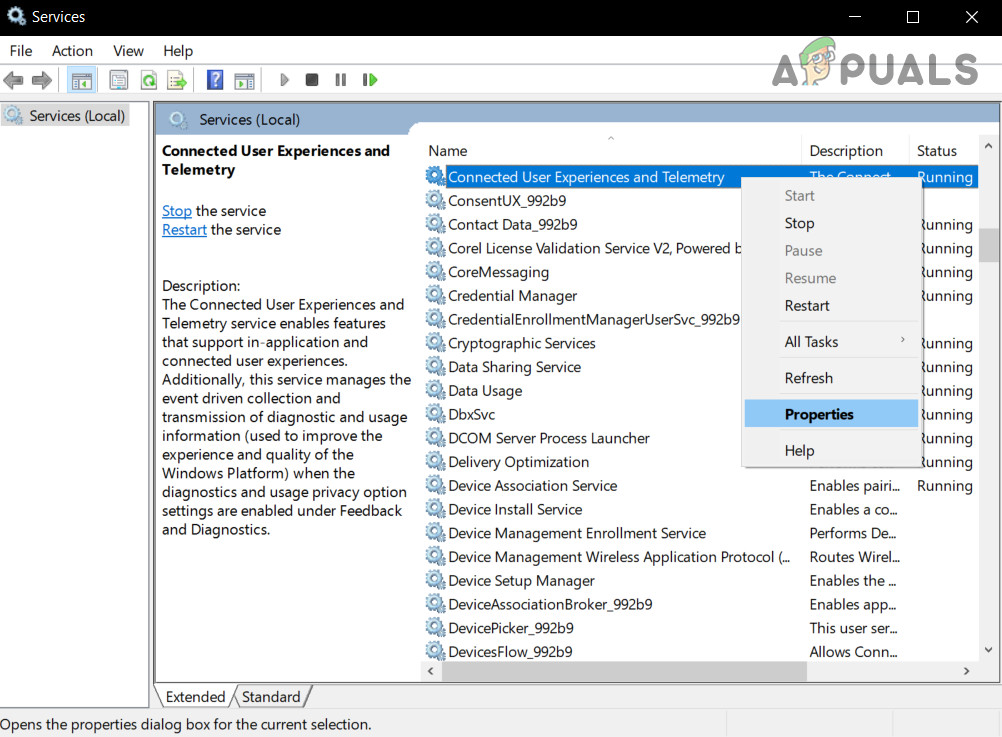
    Open Properties of Connected User Experience and Telemetry
  3. Now in the General tab, click on the dropdown box of Startup type and then select Disabled. Now click on Apply and OK.

    Change Startup Type of User Experience and Telemetry. to Disabled
  4. Restart your computer.

Method 5: Removing Telemetry and Data Collection

If none of the methods above solved this problem for you, you will have to use a Telemetry Disabling script file that we have created for you. It will decrease the load on your computer and increase your privacy by disabling some of the diagnostic and telemetry services of Windows 10. Follow the steps below:-

  1. Copy the below script to a notepad file and save as TelemRemove.bat
  2. 
         sc stop DiagTrack
    sc stop diagnosticshub.standardcollector.service
    sc config DiagTrack start= disabled
    sc config diagnosticshub.standardcollector.service start= disabled
    schtasks /Change /TN "Microsoft\Windows\Application Experience\Microsoft Compatibility Appraiser" /Disable
    schtasks /Change /TN "Microsoft\Windows\Application Experience\ProgramDataUpdater" /Disable
    schtasks /Change /TN "Microsoft\Windows\Application Experience\StartupAppTask" /Disable
    schtasks /Change /TN "Microsoft\Windows\Customer Experience Improvement Program\Consolidator" /Disable
    schtasks /Change /TN "Microsoft\Windows\Customer Experience Improvement Program\KernelCeipTask" /Disable
    schtasks /Change /TN "Microsoft\Windows\Customer Experience Improvement Program\UsbCeip" /Disable
    schtasks /Change /TN "Microsoft\Windows\Customer Experience Improvement Program\Uploader" /Disable
    reg add "HKLM\SOFTWARE\Microsoft\Windows\CurrentVersion\Device Metadata" /v PreventDeviceMetadataFromNetwork /t REG_DWORD /d 1 /f
    reg add "HKLM\SOFTWARE\Microsoft\Windows\CurrentVersion\Policies\DataCollection" /v "AllowTelemetry" /t REG_DWORD /d 0 /f
    reg add "HKLM\SOFTWARE\Policies\Microsoft\MRT" /v DontOfferThroughWUAU /t REG_DWORD /d 1 /f
    reg add "HKLM\SOFTWARE\Policies\Microsoft\SQMClient\Windows" /v "CEIPEnable" /t REG_DWORD /d 0 /f
    reg add "HKLM\SOFTWARE\Policies\Microsoft\Windows\AppCompat" /v "AITEnable" /t REG_DWORD /d 0 /f
    reg add "HKLM\SOFTWARE\Policies\Microsoft\Windows\AppCompat" /v "DisableUAR" /t REG_DWORD /d 1 /f
    reg add "HKLM\SOFTWARE\Policies\Microsoft\Windows\DataCollection" /v "AllowTelemetry" /t REG_DWORD /d 0 /f
    reg add "HKLM\SYSTEM\CurrentControlSet\Control\WMI\AutoLogger\AutoLogger-Diagtrack-Listener" /v "Start" /t REG_DWORD /d 0 /f
    reg add "HKLM\SYSTEM\CurrentControlSet\Control\WMI\AutoLogger\SQMLogger" /v "Start" /t REG_DWORD /d 0 /f
    reg add "HKCU\SOFTWARE\Microsoft\Windows\CurrentVersion\AdvertisingInfo" /v Enabled /t REG_DWORD /d 0 /f
    taskkill /im explorer.exe /f
    start explorer.exe 


  3. Once you have downloaded the script you can right-click on it and click “run as administrator”.
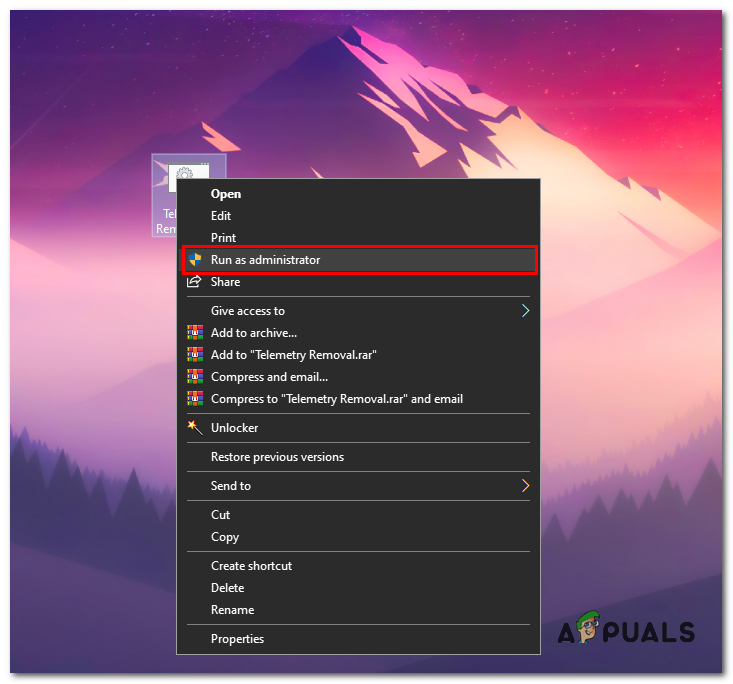
    Running the file as administrator
  4. Wait for the script to close and then restart your computer.
  5. Check to see if the usage is still high or not.

Wednesday, June 11, 2025

20 Cloud based Virtual Sandbox or CloudPC or Remote Environment Tools available for no cost

  1. Browserling – A cloud-based browser sandbox for securely running applications in an isolated virtual machine.

  2. – A web-based virtual browser for secure browsing and testing without installation.

  3. NetworkChuck Cloud Browser – A zero-trust browser isolation tool for secure browsing and malware testing.

  4. Any.Run – An interactive malware analysis sandbox that runs in the cloud, allowing real-time testing of suspicious files.

  5. – A cloud-based Windows PC that can be accessed remotely for testing and development.

  6. RollApp – A cloud-based platform that lets you run desktop applications in a browser, including development tools.

  7. DistroTest – A free online service that allows you to test various operating systems, including Windows alternatives, in a browser.

  8. AppOnFly – A cloud-based Windows desktop that allows you to run applications remotely.

  9. CloudShell – A browser-based cloud environment for running Linux and Windows applications securely.

  10. Microsoft Azure Sandbox (Microsoft Learn) – Free, temporary Windows VMs via browser-based Azure Cloud Shell for testing VSCode projects or learning Azure.

  11. – Open-source cloud sandbox with Windows VMs for dynamic malware analysis, suitable for testing VSCode project files.

  12. VirusTotal – Free service for scanning files/URLs with antivirus engines, including Windows-based sandbox analysis for VSCode files.

  13. Hybrid Analysis – Free cloud sandbox for static/dynamic analysis of files in Windows VMs, ideal for verifying VSCode project safety.

  14. Kasm Workspaces – Browser-based Desktop-as-a-Service with free Windows desktops for testing and running VSCode in a cloud environment.

  15. Google Cloud Free Tier (Compute Engine) – Free Windows VM (B1S instance) for 12 months via browser-based Google Cloud Console, suitable for VSCode development.

  16. Oracle Cloud Free Tier – Forever-free Compute Instances with Windows support via browser-based Cloud Console, ideal for VSCode projects.

  17. OnWorks – Free platform offering Windows virtual desktops via browser, suitable for running VSCode or testing Windows projects.

  18. CodeSandbox – Cloud-based development platform with Windows-compatible environments via browser, optimized for VSCode-like web projects.

  19. A few others open source projects activehttps://github.com/cuckoosandbox

    https://www.joesandbox.com/#windows

    https://testingbot.com/members/manual/new

    https://github.com/sandboxie-plus/Sandboxie

    https://capev2.readthedocs.io/en/latest/


Sandbox / Cloud VMS Related Services

ServiceDescriptionUser RatingPrice
BrowserlingOnline browser sandbox for secure browsing and testing.Not widely ratedPaid
Web-based virtual browser for anonymous browsing.Mixed reviewsPaid
NetworkChuck BrowserCloud-based secure browsing tool for OSINT and threat research.Not widely ratedPaid
Cloud gaming and virtual PC service for high-performance computing.Well-ratedPaid
RollAppCloud-based application virtualization for running desktop apps online.Mixed reviewsPaid
DistroTestOnline Linux distro testing without installation.Well-ratedFree
AppOnFlyCloud-based remote desktop service for running Windows apps.Mixed reviewsPaid
Google Cloud ShellWeb-based command-line interface for managing Google Cloud resources.Well-ratedFree
Microsoft LearnOnline training platform for Microsoft technologies.Highly ratedFree
Google Cloud FreeFree-tier cloud services including compute and storage.Highly ratedFree (limited)
Oracle Cloud FreeFree-tier cloud services with compute and database options.Well-ratedFree (limited)
OnWorksFree online virtual machines for Linux and Windows.Mixed reviewsFree
CodeSandboxOnline collaborative coding environment for web development.Highly ratedFree & Paid
TestingBotAutomated and manual browser testing platform.Well-ratedPaid


Malware Related

ServiceDescriptionUser RatingPrice
ANY.RUNInteractive malware analysis sandbox with real-time execution.Highly ratedFree & Paid
Malware analysis sandbox with automated threat detection.Well-ratedFree & Paid
VirusTotalMulti-engine malware scanning and threat intelligence platform.Highly ratedFree
Hybrid AnalysisDeep malware analysis powered by Falcon Sandbox.Well-ratedFree & Paid
Cuckoo SandboxOpen-source automated malware analysis system.Well-ratedFree
Joe SandboxAdvanced malware analysis with deep behavioral insights.Highly ratedPaid
CAPE SandboxMalware configuration and payload extraction sandbox.Well-ratedFree

Tuesday, September 26, 2023

Windows Search : Find Files or Folders with Escape Special Characters


Question: How do I find files in Windows 7+ (7, 10, 11) that have a parenthesis or dot or other special search character in the file or folder name?


Yes Microsoft's "advanced query syntax" reference for desktop search mentions nothing about this, however there is an escape sequence that can be used:


Answer: Use following syntax to escape: ~= (tilda+equals sign)

~= is an escape character and then you can put a special character like (, &, ? etc. in double quotes.

For example to find files with parentheses in the name use thew following: ~="("
For example to find files or folders that start with "Search." use the following : Search~="."*


Sunday, January 29, 2023

Microsoft Edge Settings and Flags to boost performance : Part 2


Microsoft Edge Settings and Flags to boost performance : Part 2

Microsoft Edge on Windows Setting Tweaks

Microsoft Edge on Windows Performance Tuning : Adjust Settings to increase performance and reduce IO/CPU load on Windows 10+

The majority of users merely use the standard functionality of the Microsoft Edge browser instead of exploring the many valuable choices and enhancements that are available. You should set aside some time to explore the fantastic capabilities of the Edge browser that are concealed behind settings. Use the Microsoft Edge web browser on platforms including desktop, laptop, Android, and iOS mobile phones.

Click the "three dots" in the top right corner of the screen to access Microsoft Edge settings.

Use Find (Ctrl + F or F3) in the top right corner of the browser, enter your search term, and hit enter to find it. 

Optimize Memory Usage and Battery Consumption of Device

Sleeping Tabs and Efficiency Mode | Two Ways for Boosting Device Performance

Microsoft Edge provides two main ways for improving performance of your device; Sleeping Tabs and Efficiency Mode.

Through both settings, Edge releases trapped memory resources for tabs which are inactive for some time and thus saving battery. You can control this time (for Edge action) in performance settings; say 15 minutes, 30 minutes, or some hours. However, when you turn ON the Efficiency Mode, the browser automatically activates Sleeping Mode relatively fast; say around 5 minutes after there is no activity in the tab.

When a tab becomes faded, it means, it has released CPU resources which now can efficiently be used somewhere else, where they are needed most, for example some media editing software. It is very useful when you have opened multiple webpages of websites, and you are busy in some specific website opened in a tab; so, browser will still utilize CPU and energy resources for the tab where a webpage is visible, but it will release resources for the tabs, you are not interacting with since some time.

On the other hand, Chrome does not provide such optimizations and may use excessive battery power as noted by a Chrome user in this support page.

How Much Memory and CPU Resources Are Saved by Sleeping Tabs?

Just hover mouse over any sleeping tab and it will display the information telling you the amount of memory and processing resources it saved. It is quite beneficial for the working and performance of your device.

According to a recent official Windows article:

“On average, each sleeping tab saves 85% of memory and 99% CPU for Microsoft Edge.”

How to Access Efficiency Settings in Edge Browser?

Clicking the Heart symbol in the toolbar of Edge browser. To control settings for Sleeping Mode and its time intervals, click Heart symbol and then select three dots (ellipsis) in small window and select ‘manage performance settings’.

You can also access those settings by clicking three dots in top right corner of web browser, then Settings and System and Performance.

For Which Devices Efficiency Mode Should be Activated?

No need to activate Efficiency Mode for desktop computer (connected through mains supply). For desktop computer, it is enough to just activate Sleeping Tabs for efficient utilization of resources. However, you can activate Edge Efficiency Mode for all other battery-operated devices such as laptops.

Tracking Prevention

  • I have turned ON the toggle button next to ‘Tracking prevention’ option.


Privacy

  • I have turned ON the toggle next to ‘Send "Do Not Track" requests’ option.

Diagnostic Data

  • Turn OFF the ‘optional’ diagnostic data.

  • However, you can turn OFF this optional diagnostic data. You will have to restart your computer for this change. You can do this through your Windows computer settings: Click Start → Settings → Privacy → Diagnostics and feedback → under diagnostic data select on ‘Required diagnostic data’ to turn OFF the optional diagnostic data sharing. To Access the same settings in Microsoft Edge mobile browser, click ‘three dots’ (…) on bottom of phone screen, Settings → Privacy and security → Diagnostic data.

Search and Service Improvement Data

  • I don’t mind turning the button OFF next to ‘Search and service improvement’ option. It is

Personalize your web experience

  • I have turned OF the toggle button next to this option so that Microsoft does not show me relevant ads.

Enhance Performance and Speed of Edge Browser

Settings → System and performance.

Steps to Improve Performance and Speed of Microsoft Edge Browser

★ Watch Video on YouTube → Boost Performance and Speed of Microsoft Edge

Follow these steps to improve speed and performance of Microsoft Edge.

  • ‘Preload pages for faster browsing and searching’ = ON.

  • Preload the new tab page for a faster experience = ON

  • Continue running background extensions and apps when Edge is closed = OFF

  • Turn ON the Startup Boost.

  • Turn ON the

  • ‘Save resources with sleeping tabs’ and ‘Fade sleeping tabs’.

  • ‘Use hardware acceleration when available’ = ON

  • If Edge is slow or often crashes, TURN THIS OFF.

  • Turn on efficiency mode: OFF else Battery = ON I keep it turned OFF on my computer. However, if you are using a battery-operated device like a laptop, you can turn it ON.

  • Put inactive tabs to sleep after the specified amount of time: = 15


Preload Pages and Startup Boost in Microsoft Edge

★ Watch Video on YouTube → Preload Pages and Startup Boost in Microsoft Edge. Should You Enable It?

Preload pages for faster browsing and searching. = OFF

edge://settings/system’ / Startup boost = OFF

For faster web browsing, user should also turn ON the toggle next to ‘Preload the new tab page for a faster experience’ option. This tweak can be accessed by typing or pasting (edge://settings/startHomeNTP) link in Edge browser.

For faster page loading, based on predictive preloading in background, you can also turn ON the ‘Startup Boost’ feature in Edge browser, by entering ‘edge://settings/system’ in Edge and hitting ‘Enter’ and then toggling ON the button next to ‘Startup boost’ option.

Should You Turn ON ‘Startup Boost’ and ‘Preload Pages’ in Edge Browser?

Normally, I prefer to keep the ‘Startup Boost’ and ‘Preload Pages’ options turned ON in Edge browser for faster browsing experience.

However, please keep in mind that though limited, this feature uses memory resources (RAM, SSD or HDD) as well as internet data for preloading of webpages in background.

Therefore, if you have limited data package, then you can turn it OFF.


How to Keep a Website Activated Always in Edge Browser?

Edge browser has great feature of sleeping tabs to save CPU and data resources from inactive tabs.

However, we do not want some important websites to sleep after a set time. You can tell those websites to your Edge browser in settings through below navigation path.

Click Three Dots for ‘Settings and More’ (or press Alt+F) in top right corner of Edge browser → Settings → System and performance → Optimize Performance → Never put these sites to sleep.

Here you can enter URLs of websites which you want always active to get continuous notifications

Settings : Quiet notification requests

How to Hide/Show Performance Button in Microsoft Edge?

Settings → Appearance → Select which buttons to show on the toolbar: → Performance Button.

To access settings for enhancing performance and efficiency of your device, you can hide or show the ‘Performance button’ by toggling it in settings of Edge browser.

Performance enhancement means that Microsoft Edge browser saves both memory (CPU) and battery consumption of the device. When you turn ON the performance button, it appears on the right side of address bar in toolbar. It looks like a heart filled with pulse symbol.

Fix the New Tab page

By default, Edge’s New Tab page looks a lot like MSN of yore, sporting a bunch of news, ads, and promoted links. This clutter may potentially be a source of reduced performance in Microsoft Edge.

Open a new tab in Microsoft Edge and click the gear icon in the top-right corner of this page. Now, use the following settings:

  • Layout: Focused
  • Quick links: Off
  • Background: Off
  • Show greeting: Off
  • Office sidebar: Off
  • New tab tips: Off
  • Content: Content off

Other Settings

  • edge://flags/#enable-system-notifications = disabled
  •  edge://flags/#enable-quic =  disabled (privacy) enabled (speed)
    • Be aware that DoDo wants this OFF
  • edge://flags/#disable-accelerated-video-decode and 
  • edge://flags/#disable-accelerated-video-encode
If you get menus and dialog boxes not rendering correctly, a green screen appears when playing a video on Microsoft Edge, or there are rendering issues on a virtual machine, disabling hardware acceleration can resolve the problem

  •       edge://flags/#edge-global-media-controls =  enabled
  •       edge://flags/#enable-parallel-downloading =  enabled
  •       edge://flags/#smooth-scrolling = enabled
  •       edge://flags/#back-forward-cache = enabled
  •       edge://flags/#edge-experimental-tracking-prevention-features = enabled

---------------------

Disable or Replace ntp.msn.com

The exact URL, which is called every time you open a new tab, is ntp.msn.com. Unlike Google, Edge Chromium doesn’t offer any local page, which would load a lot faster. However, you can block the URL  via the Host file. Follow our guide on how you can edit the Hosts file,

Do this and then navigate to edge://settings/onStartup and then add about:blank against Open a specific page or pages under On Startup settings.


Some More Interesting Tweaks of Favorites in Edge Browser

Click on ‘Favorites’ + click ‘three dots’ : options such as importing favorites from another browser or removing duplicate links from favorites.

In the Favorites Bar, you can right-click any folder to see more interesting options; for example, you can open all Favorites links at once in a window.

In Favorites Bar, click any folder, then hover your mouse on any link and then right-click and you will see many useful options such as to edit, copy, cut or delete a specific link from the favorites.

---------------------