Showing posts with label Visual Studio. Show all posts

Tuesday, July 1, 2025

Add ‘Open Bash Here’ into Visual Studio

 With the rise of cross-platform development, the need for Linux tools like bash has become more prevalent, even in Windows environments. Developers often need to run bash scripts for tasks such as deploying services to Azure or managing containers. An integrated bash prompt in Visual Studio, opening directly at a file’s location, can significantly streamline this process. Here we create a script amd config.VS to run it


Why

In a mixed development environment where Windows and Linux tools are both essential, there’s a challenge: Windows uses a different file path structure compared to Linux. When developing on Windows with Visual Studio but needing to run Linux-based tools (like bash scripts), there’s a disconnect — the paths don’t translate automatically between systems. This is where a Linux script comes into play.


Creating the script

To bridge this gap, we created a Linux script that performs path translation. It takes a Windows file path as input, converts it into a Linux-friendly path, and then opens a bash shell at that location.


vi ~/.open-wsl-bash.sh


#!/bin/bash

win_path=$1

# Replace single backslashes with double backslashes

win_path=${win_path//\\//\\\\}

# Translate the Windows path to WSL path

wsl_path=$(wslpath -u "$win_path")

# Navigate to the directory and open bash

cd "$wsl_path" && exec bash

Script Breakdown

#!/bin/bash: Shebang line to indicate the script uses bash.

win_path=$1: Assigns the first argument passed to the script to win_path.

win_path=${win_path//\\//\\\\}: Doubles the backslashes to escape them properly for bash.

wsl_path=$(wslpath -u "$win_path"): Uses wslpath to convert the Windows path to a WSL path.

cd "$wsl_path" && exec bash: Changes to the directory and opens a new bash shell.

This script is an essential piece of the puzzle for a seamless development experience across Windows and WSL environments.


Adding the External Command in Visual Studio

Find the path to wt.exe.

Navigate to Tools > External Tools.

Click “Add” and configure:

Title: Open Bash Here

Command: Path to your wt.exe.

Arguments: --profile "Ubuntu-20.04" -- bash -c "bash ~/.open-wsl-bash.sh '$(ItemDir)'"

Initial directory: $(ItemDir)

Visual Studio: Adding external command

“Ubuntu-20.04” is the name of my Linux Windows Terminal profile. Change it to your Linux profile name.


Conclusion

With this setup, you’ll have a seamless “Open Bash Here” command in Visual Studio that improves the development workflow by providing quick access to a Linux bash environment at the location of your current file.


Sunday, July 17, 2022

Utility Powershell and Dos Commands: Save Output and Commands to file, Get Versions, Get Folder, Update Common Packages

 ###########################  
 # Write output and commands to text file DOS and PS  
 #########################  
 REM Check Version of spfx related packages and save to a file  
 node --version >> C:\temp\Logs\cmdPrompt.log  
 npm --version >> C:\temp\Logs\cmdPrompt.log  
 pnp --version >> C:\temp\Logs\cmdPrompt.log  
 yo --version >> C:\temp\Logs\cmdPrompt.log  
 gulp -v >> C:\temp\Logs\cmdPrompt.log  
 nvm ls >> C:\temp\Logs\cmdPrompt.log  
 choco --version >> C:\temp\Logs\cmdPrompt.log  
 type C:\temp\Logs\cmdPrompt.log   
 REM save command output to a file and command error output STDERR and STDOUT  
 choco --version 1>> C:\temp\Logs\cmdPrompt.log 2>&1   
 REM View file in cmd  
 type C:\temp\Logs\cmdPrompt.log   
 REM Save commands to append to a file  
 doskey /history >> C:\temp\Logs\cmdPrompt.Commands.log  
 REM Copy the Command Output to Windows Clipboard  
 REM ould copy the details of your network connections to the clipboard:  
 ipconfig /all | clip  
 REM opy the contents of a folder to the clipboard  
 dir | clip  
 # Powershell save commands + output  
 # ps output to a file, output to a text file with PowerShell on Windows 11 or Windows 10,   
 ipconfig | Out-File -FilePath C:\temp\Logs\cmdPrompt.log  
 #view the saved output on the screen  
 Gt-Content -Path C:\temp\Logs\cmdPrompt.log  
 # saving BOTH the commands you type AND all their output? I'm not talking about piping the output of any one to a file, like above. Instead, this is about the PowerShell Start-Transcript cmdlet. Try it out some time:  
 Start-Transcript  
 # Without any parameters, the transcript will be saved in the user’s documents folder, filename will automatically be generated and consists of the device name, random characters  
 #e.g:   
 # c:\users\name\documents\PowerShell_transcript.DEVICENAME.qp9EOTN2.20220301132612.txt  
 # Start recording  
 Start-Transcript  
 # stop recording  
 Stop-Transcript  
 # start options  
 # Append to a log file.  
 Start-Transcript -Path C:\temp\Logs\cmdPrompt.log -Append  
 #use -NoClobber prevent overwriting file  
 Start-Transcript -Path C:\temp\Logs\cmdPrompt.log -NoClobber  
 # -OutputDirectory parameter. This way we can specify the directory where we want to store the log file  
 Start-Transcript -OutputDirectory C:\Temp\Logs  
 # Result:  
 Transcript started, output file is C:\Temp\Logs\PowerShell_transcript.WIN11-LAB02.uftVAXsv.20220301045218.txt  
 # limit the header information to only a timestamp o  
 Start-Transcript -OutputDirectory C:\Temp\Logs -UseMinimalDeader  
 # E.g:  
 **********************  
 PowerShell transcript start  
 Start time: 20220301135543  
 **********************  
 # See also: https://itluke.online/2019/03/24/what-is-captured-with-powershell-transcripts/ for Verbose+Debug levels  
 # See also: https://4sysops.com/archives/powershell-transcript-record-a-session-to-a-text-file/  
 ###########################  
 # Get Versions  
 #########################  
 # PS get version of Spfx imprtant packages  
 node --version   
 npm --version   
 pnp --version   
 yo --version   
 gulp -v   
 nvm ls   
 choco --version   
 winget --version  
 # get version of Powershell  
 host  
 # or  
 $PSVersionTable  
 $PSVersionTable.PSVersion  
 # get the value of the PowerShellVersion parameter in the registry key   
 (Get-ItemProperty -Path HKLM:\SOFTWARE\Microsoft\PowerShell\3\PowerShellEngine -Name 'PowerShellVersion').PowerShellVersion  
 #Version of PowerShell on Remote Computers  
 Invoke-Command -ComputerName 192.168.1.15 -ScriptBlock {$PSVersionTable.PSVersion} -Credential $cred  
 # get version of .Net + .Net Core  
 # versions of the .NET SDK are currently installed with a terminal  
 dotnet --list-sdks  
 (dir (Get-Command dotnet).Path.Replace('dotnet.exe', 'sdk')).Name  
 # which versions of the .NET runtime   
 dotnet --list-runtimes  
 (dir (Get-Command dotnet).Path.Replace('dotnet.exe', 'shared\Microsoft.NETCore.App')).Name  
 # dotnet core installed runtimes and SDKs, as well as some other info:  
 dotnet --info  
 # .NET Framework   
 # get from https://github.com/jmalarcon/DotNetVersions/releases save to C:\Windows\System32 or PATH  
 dotnetversions -b  
 # security updates and hotfixes that are installed on a computer using PowerShell:  
 $DotNetVersions = Get-ChildItem HKLM:\SOFTWARE\WOW6432Node\Microsoft\Updates | Where-Object {$_.name -like  
  "*.NET Framework*"}  
 ForEach($Version in $DotNetVersions){  
   $Updates = Get-ChildItem $Version.PSPath  
   $Version.PSChildName  
   ForEach ($Update in $Updates){  
     $Update.PSChildName  
     }  
 }  
 # Get CLR versions  
 # displays all the versions of the CLR installed on the computer. dl Clrver.exe (CLR Version Tool)  
 clrver   
 # get version of VS Code / Visual Studio   
 code --version  
 nuget help | select -First 1  
 dotnet nuget --version  
 # change based on version to be checked  
 (Get-Item "${env:ProgramFiles(x86)}\Microsoft Visual Studio 11.0\common7\ide\devenv.exe").VersionInfo.ProductVersion  
 # get paths to GAC  
 gacutil.exe -l  
 # get version of PnP  
 # get version of Spfx  
 REM DOS Get   
 Version of spfx related packages and save to a file  
 node --version >> C:\temp\Logs\cmdPrompt.log  
 npm --version >> C:\temp\Logs\cmdPrompt.log  
 pnp --version >> C:\temp\Logs\cmdPrompt.log  
 yo --version >> C:\temp\Logs\cmdPrompt.log  
 gulp -v >> C:\temp\Logs\cmdPrompt.log  
 nvm ls >> C:\temp\Logs\cmdPrompt.log  
 choco --version >> C:\temp\Logs\cmdPrompt.log  
 type C:\temp\Logs\cmdPrompt.log   
 ###########################  
 # Get Install Folders  
 #########################  
 # get install location of powershell  
 ###########################  
 # Update ps, choco,   
 #########################  
 #update ps core  
 iex "& { $(irm https://aka.ms/install-powershell.ps1) } -UseMSI"  
 # or   
 winget install PowerShell  

Thursday, May 14, 2020

Entity Framework 6 : Default Code First Conventions

EF 6 Code First Default Conventions :

1) Default Inheritance Type: Table Per Hierarchy (TPH)

2) foreign key properties

- Any property with the same data type as the principal primary key property and

- with a name that follows one of the following formats represents a FK for the relationship:

  • <navigation property name><principal primary key property name>',
  • '<principal class name><primary key property name>', or
  • '<principal primary key property name>'

3) Primary Key Convention

-property is a primary key if a property on a class is named “ID” (not case sensitive), or the class name followed by "ID".

4) If FK on the dependent entity is not nullable, then Code First sets cascade delete on the relationship.

- Nullable:

public int? CountryId { get; set; }

5) Type Discovery:

- you define a context class that derives from DbContext and exposes DbSet properties for the types that you want to be part of the model.


6) exclude a type from the model

-use the NotMapped attribute or the DbModelBuilder.Ignore fluent

7) No PK or FK: Its a complex type. Complex Type rules include:

- type does not have properties that reference entity types and

- is not referenced from a collection property on another type.

Wednesday, May 13, 2020

.Net Database Connection String Samples

1. Web.Config Connection String

<configuration> <connectionStrings> 
<add name="myConnection" connectionString="server=localhost;database=mydatabase;" /> </connectionStrings> </configuration>

2. Get connection string using the ConfigurationManager class:
string conn = ConfigurationManager.ConnectionStrings["myConnection"].ConnectionString;
3. EF Reference Connection String in DB Context Ctor:
public class DatabaseContext : DbContext {
public DatabaseContext() : base("myConnection")
{ } }
4. SQL Server Connection String Integrated Security:
<connectionStrings>
<add name="sqlServer" providerName="System.Data.SqlClient" connectionString="Data Source=localhost;Initial Catalog=MyDatabase;Integrated Security=True;" /> </connectionStrings>
5. SQL Server Connection String SQL Authentication:
<connectionStrings>
<add name="sqlServer" providerName="System.Data.SqlClient" connectionString="Data Source=localhost;Initial Catalog=MyDatabase;User Id=user;Password=pwd;" /> </connectionStrings>

6. My SQL Connection String:
<connectionStrings>
<add name="mySql" providerName="MySql.Data.MySqlClient" connectionString="Server=localhost;Database=MyDatabase;Uid=user;Pwd=pwd;" /> </connectionStrings>

7. Oracle Connection String
Data Source=ABC.Company.OraDSName;User Id=myUid;Password=mypwd;
8. SQL Server by Database Name
<add name="MyDBStage" connectionString="Database=MyDBStage;Server=.\sql2012;Integrated Security=SSPI;"
      providerName="System.Data.SqlClient" />
9. Connection String using Model:
<connectionStrings>
    <add name="MyDBEntities" connectionString="metadata=res://*/Data.MyDB.csdl|res://*/Data.MyDB.ssdl|res://*/Data.MyDB.msl;provider=System.Data.SqlClient;provider connection string=&quot;data source=SP2013E\SPSQL;initial catalog=MyDB;integrated security=True;MultipleActiveResultSets=True;App=EntityFramework&quot;" providerName="System.Data.EntityClient" />
  </connectionStrings>
10. MS Dynamics Connection String
<add name="Xrm" connectionString="Server=http://myCompany.crm5.dynamics.com; Domain=myCompany; Username=myUserId@myCompany.com.au; Password=Secret0102"/>
  </connectionStrings>
11. Named Connection String Integrated Security:
<add name="MyDBConnString" connectionString="Database=MyDB;Server=MyServer;Integrated Security=SSPI;"
      providerName="System.Data.SqlClient" />
  </connectionStrings>
12. References:

Connection Strings Samples
MS Connection Strings

Guide to Connection Strings

Saturday, May 9, 2020

.Net Framework vs .Net Core vs .Net Standard

What is .Net Standard and why does it show as a project platform type in Visual Studio when I click New Project?
Well, .net Standard is NOT a platform, it is a standard. If we remember that, then it makes sense. Think of .net standard as the mesh that maps the various platform version together for interoperability. See the below table:


What is .NET Standard?

.NET Standard is a specification (not an implementation of .NET) which defines the set of APIs that all .NET implementations must provide. It addresses the code sharing problem for .NET developers across all platforms by bringing APIs across different environments.
We can think of it as another .NET Framework, except that we use it to develop class libraries only. .NET Standard is a successor of the portable class library.
Ok, so .NET Standard specifies the APIs that need to be implemented.
But which APIs does it cover?
To answer this question in short – there are multiple versions of .NET Standard. Each version includes a set of APIs which we are going to cover in a while.


Thursday, December 5, 2019

Visual Studio 2017 IDE Editor and Refactor Enhancements

1. In Editor Object/Property Hierarchy Tool Tip

See https://youtu.be/CZwNvU_Qtig?t=64


2.  Refactor Object Initialization:

See https://youtu.be/CZwNvU_Qtig?t=103

3. Split String Literals on Enter!

See https://youtu.be/CZwNvU_Qtig?t=187

4. Convert String.Format to String Interop (replace tokens with variable Names)

https://youtu.be/CZwNvU_Qtig?t=243


5. Create new file from class or rename file to class name

https://youtu.be/CZwNvU_Qtig?t=286

and https://youtu.be/CZwNvU_Qtig?t=349

6. Filter Intellisense list on-demand, Show Intellisense on Del/BkSpc

https://youtu.be/CZwNvU_Qtig?t=413

and https://youtu.be/CZwNvU_Qtig?t=578


7. Find Reference Changes:

https://youtu.be/CZwNvU_Qtig?t=693

8 Edit | “Go to” or Ctrl-T enhancements:

https://youtu.be/CZwNvU_Qtig?t=823

Friday, June 14, 2019

Office 365 Subscriptions: Developer vs Business vs Enterprise

and

E1 vs E3 vs E5 ect.

So MS just cleared things up a bit or added dirt to the water even more depending on your view point.

I will break this into 2 areas: Developer Subscriptions and Business Subs.

MS announced June 2019 that Office 365 Developer is now 90 day auto-renewing, changing from yearly expiring. This now means A) tenant can be preserved over time without need to move to a new tenant or pay subscription at end of year and B) you need to refresh+access your dev tenant at least every 90 days to ensure the subscription does not expire. .

Office 365 Developer

Start here : subscription is an Office 365 Enterprise E3 Developer subscription with 25 user licenses. It lasts for 90 days and is free to use for development


Expiration Changes

New Office 365 Developer Subscription expiration rules


2 ways to get O365 Developer Subscription:

O365 Developer Subscription via Visual Studio Subscription

- VS Professional= 249 per yr includes O365 Dev Sub

https://my.visualstudio.com/benefits

O365 Developer Subscription via Direct

- 90 Day Free or

- Yearly Paid Sub : 99 per yr (or 8$ per mos)

https://developer.microsoft.com/en-us/office/dev-program 

Excellent Step by Step how to Create


Create a test Environment

Office 365 dev/test environment

and

See Data into O365 Tenant and SharePoint Online

and

Azure Hybrid Setup w/ Azure Credits

What’s Includes and NOT includes in O365 Developer Subscription?


Your developer subscription includes the following:

Exchange Online (Plan 2)
Flow for Office 365 Plan 2
Microsoft Forms (Plan E5)
Microsoft Planner
Microsoft Stream for Office 365 E5 SKU
Microsoft Teams
Mobile Device Management for Office 365
Office 365 ProPlus
PowerApps for Office 365 Plan 2
SharePoint Online for Developer
Skype for Business Online (Plan 2)
Sway
To-Do (Plan 3)


What is NOT includes:

PowerBI (PowerBI for free)

Azure Credits

Azure Subscription + Azure Functions 

Develop PowerApps, Azure Functions and Flow

https://docs.microsoft.com/en-us/azure/azure-functions/functions-create-first-azure-function
https://collab365.community/how-to-use-microsoft-powerapps/
http://blog.sharedove.com/adisjugo/index.php/2018/11/29/extending-powerapps-and-flow-part-1-adding-custom-data-sources-through-azure-api-apps/

Check my Office 365 Developer Subscription Status:

O365 Developer Dashboard


Also, when adding licenses,

Understand what happens when you assign a license to someone

The following table lists what automatically happens when you assign a license to someone:

If the subscription has this service
This automatically happens

Exchange Online
A mailbox is created for that person.

SharePoint Online
Edit permissions to the default SharePoint Online team site are assigned to that person.

Skype for Business Online
The person will have access to the features associated with the license.

Office 365 ProPlus
The person will be able to download Microsoft Office on up to 5 Macs or PCs, 5 tablets, and 5 smartphones.


Office 365 Business:

See here more info

https://docs.microsoft.com/en-us/office365/servicedescriptions/office-365-platform-service-description/office-365-plan-options

Thursday, April 25, 2019

Check .Net Framework Version on any Windows Machine

  1. Open the command prompt (i.e Windows + R → type "cmd").
  2. Type the following command, all on one line: This will list all the .NET versions.

reg query "HKEY_LOCAL_MACHINE\SOFTWARE\Microsoft\NET Framework Setup\NDP"

Results: http://prntscr.com/ngyyuz


  1. To get the latest .NET 4 version; Type following cmd, on a single line:

reg query "HKEY_LOCAL_MACHINE\SOFTWARE\Microsoft\NET Framework Setup\NDP\v4\full" /v version

results: http://prntscr.com/ngyyxn

Sunday, March 24, 2019

Customize Find in Files Find Results format of results

So Im using VS 2017, find in files, the Find Results is displaying an awful long result for each file name found as the result of a search. This makes it difficult to quickly ascertain the fie name. Previous versions of VS by default displayed the file name, it seems (for me atleast) that VS 2017 is displaying the Full name in Find Results. See example here


To resolve we would like to view FileName or relative full name in the Find Results.
To do this, we need to implement a per version solution for VS:

>= VS 2017

  • Close Visual Studio 2017
  • Open regedit
  • Open bin file:
"C:\Users\[userName]\AppData\Local\Microsoft\VisualStudio\15.0_f294cc8e\privateregistry.bin"
  • Select HKEY_LOCAL_MACHINE from the left bar
  • Select File > Load Hive...
  • Load the privateregistry.bin file from %localappdata%\Microsoft\VisualStudio\15.0_[instanceid]{RootSuffix}\privateregistry.bin. The RootSuffix for a normal VS installation will be blank. This is mostly used for the experimental instance
  • Name the key whatever you want (e.g. "VS2017") when prompted
  • From there, you should be able to view the entries just like any normal registry.
  • Customize it according to accepted answer's suggestions.
  • Once you're finished, you need to make sure that you "Unload" the private registry, by selecting the "root" key ("VS2017" in this example) and selecting File > Unload Hive . If you don't do this, VS won't be able to read the privateregistry.bin file when it runs, causing major problems
< VS 2017
Using regedit:
See article Customize how Find in Files results are displayed in the Find Results Window:
Example here


Format specifiers:
Files
  • $p - path
  • $f - filename
  • $v - drive/unc share
  • $d - dir
  • $n - name
  • $e - .ext
Location
  • $l - line
  • $c - col
  • $x - end col if on first line, else end of first line
  • $L - span end line
  • $C - span end col
Text
  • $0 - matched text
  • $t - text of first line
  • $s - summary of hit
  • $T - text of spanned lines
Char
  • \n - newline
  • \s - space
  • \t - tab
  • \\ - slash
  • \$ - $

Tuesday, September 11, 2018

Use Tesseract OCR with C# to separate receipt images from non-text images

Using TesseractEngine C# wrapper to identify image with text, based on default confidence and learning, flag image as either to move or not to move. This method returns a List<> of file names that can then be used to move the files to a separate directory.


This comes in handy when you have a dump of Phone Images with Camera images mixed with Receipts. You can either manually move files or use this to reduce the manual burden. See attached zip, and here for details of source lib and demo.

More Samples here

Download Source Here

App is run with following params:

ReceiptMover ocr c:\temp\input c:\temp\output *.jpg .4

/// <summary>
        /// Convert image to tif and OCR using TesseractEngine 3.0.2
        /// </summary>
        /// <param name="imgPath"></param>
        /// <param name="dataPath"></param>
        /// <param name="minconf"></param>
        /// <returns></returns>
        static bool OCRImage(string imgPath, string dataPath, float minconf)
        {

           bool r = false;
            bool doKill = false;
            string newPF = imgPath;
            try
            {

               // create tif if neeeded,
                var ext = FileHelper.GetFileNameExtension(imgPath);
                if (!ext.ToUpper().StartsWith("TIF"))
                {
                    WriteLine("CONVERT TO TIF ->....... " + FileHelper.GetFileName(imgPath));
                    using (var imgB = new Bitmap(imgPath)) // Load of the image file from the Pix object which is a wrapper for Leptonica PIX structure
                    {

                       string newF = FileHelper.GetFileName(imgPath).ToUpper().Replace(ext.ToUpper(), "tif".ToUpper());
                        newPF = Paths.Combine(FileHelper.GetFilePath(imgPath), newF);
                        if (File.Exists(newPF))
                            FileHelper.KillFile(newPF);
                        imgB.Save(newPF, System.Drawing.Imaging.ImageFormat.Tiff);
                       
                        WriteLine("SAVED  TO TIF ->....... " + newPF);
                        doKill = true;
                    }
                }


               //ocr tif ,if any text we seperate it from non receipt/text images
                using (var tEngine = new TesseractEngine(@"./tessdata", "eng", EngineMode.Default)) //creating the tesseract OCR engine with English as the language
                {
                   
                    using (var img = Pix.LoadFromFile(newPF)) // Load of the image file from the Pix object which is a wrapper for Leptonica PIX structure
                    {
                        WriteLine("TesseractEngine.Process(img) start at ->....... " + FileHelper.GetFileName(imgPath) + ", " + DateTime.Now.ToString());
                        //using (var page = tEngine.Process(img, PageSegMode.Auto)) //process the specified image
                         //using (var page = tEngine.Process(img)) //process the specified image
                        using (var page = tEngine.Process(img, PageSegMode.SingleColumn)) //process the specified image
                        {

                       
                            WriteLine("TesseractEngine.Process(img) END at -> " + FileHelper.GetFileName(imgPath) + ", " + DateTime.Now.ToString());
                            var text = page.GetText(); //Gets the image's content as plain text.
                                                       // var textO = page.GetHOCRText(0); //Gets the image's content as plain text.
                            WriteLine("tEngine.GetText(img) END at -> " + FileHelper.GetFileName(imgPath) + ", " +  DateTime.Now.ToString());

                           if (!string.IsNullOrEmpty(text))
                            {
                                text = text.Trim().Replace("/n", "");
                            }
                            if (StringUtil.IsValid(text))
                            {

                               Debug.WriteLine("Found text: " + text); //display the text
                                var conf = page.GetMeanConfidence();
                                WriteLine("GetMeanConfidence-> " + conf.ToString()); //Get's the mean confidence that as a percentage of the recognized text.
                                if (conf >= minconf)
                                {
                                    WriteLine("****Found RECEIPT: " + FileHelper.GetFileName(newPF)); //display the text
                                    r = true;
                                }

                           }
                            else
                            {
                                WriteLine("NODATA: " + FileHelper.GetFileName(newPF)); //display the text
                            }

                       }
                    }
                }
            }
            catch (Exception e)
            {
                WriteLine("OCRImage Error: " + e.Message);
            }
            //remove temptiff
            if (doKill)
            {
                FileHelper.KillFile(newPF);
            }
            return r;
        }


Monday, July 23, 2018

SharePoint 2013 Designer Error on Workflow : Server-side activities have been updated. You need to restart SharePoint Designer to use the updated version of activities.

Summary:


Option 1)

A full clean uninstall of Visual Studio 2015  did the trick to get SharePoint Designer 2013 working again for me. All Workflows finally open OK again!!!!

Here are some highlights of lessons learned, that I hope can be used in case anyone may encounter this in the future:

1) Always install SharePoint Designer 2013 before Visual Studio 2015.

2) If  Visual Studio 2015 IS installed before SharePoint Designer 2013 then you may encounter an error :

a. “Server Side Activities have been updated”

i. https://answers.microsoft.com/en-us/msoffice/forum/all/sharepoint-2013-designer-workflow-issue-server/f36da602-5000-43ed-97c4-a273a5600c15

3) When uninstalling Visual Studio 2015, the default uninstaller does not “clean” everything. The below tool can be used to completely remove Visual Studio 2015 to ensure that any new install starts with as fresh clean environment:

a. http://ridilabs.net/post/2017/03/11/Clean-Uninstall-Visual-Studio-2015-to-Install-Visual-Studio-2017.aspx#.WqY4wleJIuU


Option 2):

Please close your SharePoint Designer application, clear/delete the cached files and folders under the following directories from your server installed SharePoint Designer, then check results again.

<user profile>\appdata\roaming\microsoft\SharePoint Designer\ProxyAssemblyCache
<user profile>\appdata\local\microsoft\websitecache\<sitename>


Option 3)

Install Patch:

https://support.microsoft.com/en-us/help/3114337/january-12-2016-update-for-sharepoint-designer-2013-kb3114337

Tuesday, June 26, 2018

Visual Studio 2012+ Improve Load Time, Performance, Build and Debugging Speed

See also:
http://jrdtechnologies.blogspot.com/2016/12/slow-visual-studio-debugging-experience.html

Union with tips from:

visual studio - Why is VS 2013 very slow? - Stack Overflow
https://stackoverflow.com/questions/19617670/why-is-vs-2013-very-slow

and
10 Tips to Improve Visual Studio Build Performance - CodeProject
https://www.codeproject.com/Tips/1042975/Tips-to-Improve-Visual-Studio-Build-Performance

I will compile shortly...

Saturday, June 23, 2018

Visual Studio to .Net FW Compatibility and Visual Studio to DevsExpress Compatibility


Visual Studio to .Net:

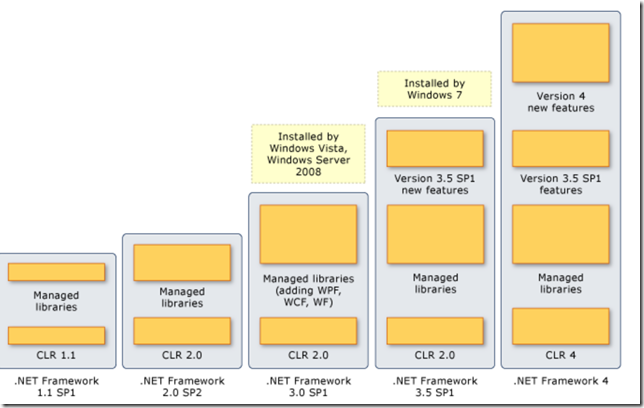
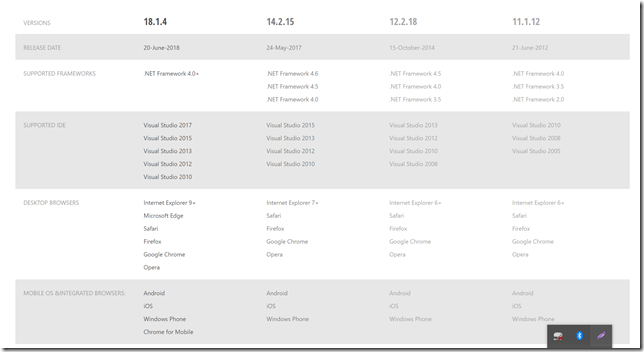
Each version of Visual Studio prior to Visual Studio 2010 is tied to a specific .NET framework. (VS2008 –> .NET 3.5, VS2005 –> .NET 2.0, VS2003 –> .NET1.1) Visual Studio 2010+ allows targeting of older .Net FW, but can’t be used for future .Net FW. For .Net 4.5+ we must use VS2012+, see below tables showing dependency mapping.

References:

Install Links for all .Net FW : Developer and Distribution Package

MS VS and .Net Version and Dependency Guide Detail

how to check .Net FW Versions

.Net to Visual Studio to Windows Version History & Compatibility Summary

.NET Framework version

Desc

VS.NET

OS

4.7.2

-Crypto+Asp.Net.

N/A

10,8.1,7; Svr: 2016, 2012, 2008R2Sp1

4.7.1

SHA/TryParse.

N/A

10,8.1,7; Svr: 2016, 2012, 2008R2Sp1

4.7

JSON.


10,8.1,7; Svr: 2016, 2012, 2008R2Sp1

4.6.2

- Cryptography enhancements,


10,8.1,7; Svr: 2016, 2012, 2008R2Sp1

4.6.1

- Support for X509 certificates


+ 10
+ 8.1
+ 8
+ 7

4.6

- Compilation using .NET Native
- ASP.NET Core 5

2015,.

10,8.1,7,Vista; Svr: 2016, 2012, 2008R2Sp1

4.5.2

Tx Support

-

8.1,7; Svr: 2012, 2008R2Sp1

4.5.1

- Support for Windows Phone Store apps
- Automatic binding redirection
- Performance and debugging

2013

8.1,7, Vista; Svr: 2012, 2008R2Sp1

4.5

- Support for Windows Store apps
- WPF, WCF, WF, ASP.Net

2012

8,7, Vista; Svr: 2012, 2008R2Sp1

4

- Expanded base class libraries
- Cross-platform development with Portable Class Library

2010

8,7, Vista; Svr: 2012, 2008R2Sp1

3.5

- AJAX- LINQ

2008

8,7, Vista; Svr: 2012, 2008R2Sp1

3.0

- WPF, WCF, WF

-

8,7, Vista; Svr: 2012, 2008R2Sp1

2.0

- Generics

2005

-

1.1

- ASP.NET and ADO.NET
- Side-by-side

2003

-

1.0

First version of the .NET Framework.

Visual Studio .NET

-

Visual Studio to .Net FW 1-4

.

.NET Framework version

CLR version

VS IDE version

Description

1.0

1.0

Visual Studio .NET

Contained the first version of the CLR and the first version of the base class libraries.

1.1

1.1

VS2003

Included updates to ASP.NET and ADO.NET.Has (SP1) and SP2.

2.0, 3.0

2.0, 3.0

VS2005

generics, generic collections, Has SP1 and SP2.

3.5

2.0

VS2008

AJAX-enabled Web sites LINQ. Has SP1

4

4

Visual Studio 2010

(MEF), (DLR), and code contracts.

Windows OS to .Net FW 1-4

.NET Framework versions

Windows versions

1.0, 1.1, and 2.0

No OS

3.0, 2.0SP2, 3.5

Windows Vista and Windows Server 2008.

3.5 SP1

Windows 7.

4

Compat Windows XP, Windows Server 2003+

image


Visual Studio to SharePoint Solutions:

image


Dev Express to Visual Studio Dependencies:

image

Friday, May 5, 2017

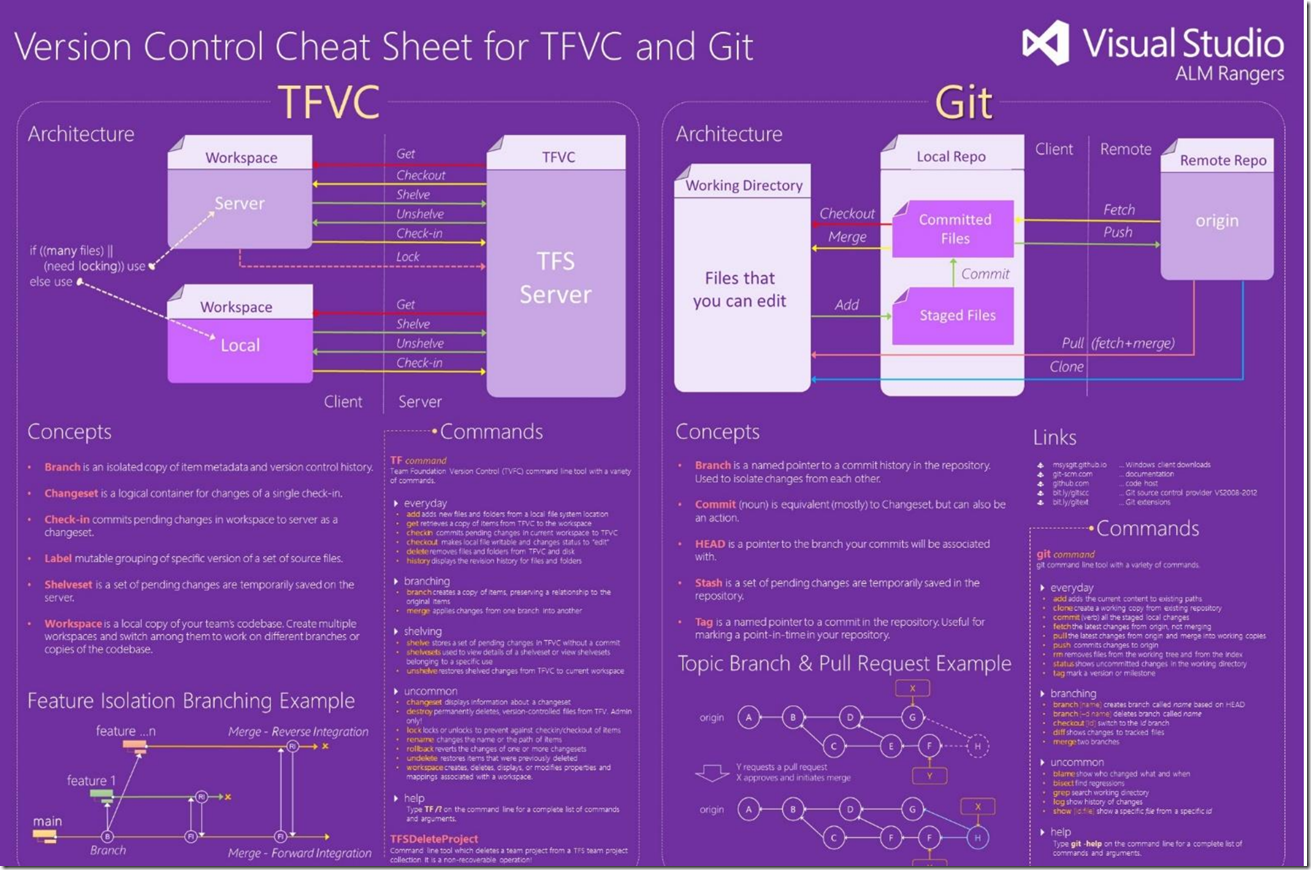
Git Cheat Sheet for TFS UsersEnter a post title


If you r moving to Git from TFS to SVN or another centralized VC system, then you may find the below command mapping helpful. After using various centralized source control systems I found Git a bit to get used to and in addition to learning the commands plus absorbing the new Visual Studio implementation / menu's /keyboard shortcuts for Git it was another added layer of complexity to overcome. Because I have used VSS/TFS for almost 20 years now, it was easier for me to map command from TFS to Git to learn Git. I found some resources below to help,

Basic Mapping

TFS Version Control

Git

Workspace

Repository (aka. “Repo”)

Get Latest  (First time)

Clone

Get Latest (After first time)

Pull

Check in

Commit + Push

Check out

(just start typing)

Branch

Branch

Merge

Merge

Code Review

“pull request”

Shelveset

Stash

Undo Pending Changes

"Undo" to revert to the last committed version

View History

"View History"

Label

Tag

Shelve

Stash - just local ! (on local machine ...)

Included changes

Staged

Excluded changes

not staged

Solution : Clean

Clean (remove unmarked files)

Merge and Resolve Conflicts

Rebase (see below def)


Hope this helps.


Cheat Sheet

CheatSheet

Git to TFS Overview

1. Many commands in Git, Local and Remote Repo

2. A Repo is just a folder in simple terms

3. There is no checkout - lock !

a. There is, but it is completely different

2. You can irreversible override changes made by somebody other (and by yourself as well)

a. • git commit --amend

b. • Basic support in VS 2015 •

c. Suitable for basic scenarios + 3rd party + extensions for Visual Studio

d. All else command line git ! :-)

3. Resources:

a. https://jeremybytes.blogspot.com/2014/12/git-integration-in-visual-studio-2013.html

b. https://www.dotnetweekly.com/git-cheat-sheet-for-tfs-users/

c. http://vsarbranchingguide.codeplex.com/releases/view/117523

d. https://www.git-tower.com/blog/git-cheat-sheet/

e. https://wikileaks.org/ciav7p1/cms/files/atlassian_git_cheatsheet.pdf

4. Other Resources

Git for beginners: The definitive practical guide

Git Cheat Sheet for TFS Users

Try git

Online git command line tool for training purposes

Git - Wikipedia

Git “home page”

Download for windows

Git Extensions Windows tool/UI + VS 2015 plugin

Other Windows GUI tools

5. ReBase:

rebase: takes all the work u have done in a branch & changes the history of that branch so that your changes are based on a different version of code. Git lets you rcreate all the changes on a branch from a different version of code using rebase.

https://channel9.msdn.com/series/Team-Services-Git-Tutorial/Git-Tutorial-Rebase

6. Commit and Merge Scenario:

Git: How to commit and merge

Hi,
I'm using Git just one year, and in second team, so here are three "algorithms" or "patterns" which I recognized yet:

1. Git+Gerrit+Jira, branch, commit --amend, upload

create branch per Jira item  

develop code

try to pull

solve merge conflicts

commit

upload (push + upload to gerrit )

... wait for gerrit review ...

change code (regarding gerrit review)

try to pull

solve merge commits

commit --amend (rewrite your commit - be careful )

upload

...

This is probably good solution for big projects with long term gerrit review process ...

2. Git+Gitlab, master, stash, merge, push

Probable suitable just for not so big project (lines/changes/developers)
Just one branch used locally.

You will change code.

When there is something new on origin/master you will try to pull

If it is impossible to pull, you will stash changes

pull

stash apply - solve merge conflicts 

continue if needed

push ( no review before push)

3. Git+Gitlab, master, commit, merge, push

The same as above but stash is not used, just commit and push.
But then merge commits will appears.
Probable suitable just for not so big project (lines/changes/developers)
Just one branch used locally.

You will change code.

When there is something new on origin/master you will try to pull

If is impossible to pull, you will commit changes

pull

solve merge conflicts 

continue if needed

push ( no review before push)

How do I? (from MSDN)

Visual Studio's Team Explorer lets you perform Open Team Explorer through the View menu in Visual Studio, or with the Ctrl+\, Ctrl+M hotkey.

Team Explorer and the Git cmd work together. updates changes reflected in the other.

TIP

Windows users: If you aren't using Visual Studio, installing Git for Windows will set up the Git credential manager for Windows. The credential manager makes it easy to authenticate with your Team Services repos.

While in Visual Studio, open cmd in repo via Team Explorer’s Connect view. Right-click local repo | Open Command Prompt

clip_image003[10]

Repos

How do I ?

Git command line

Visual Studio

Create a repo in a new folder

git init foldername

Select the Connect button ( clip_image004[10] ) in Team Explorer to open the Connect view, then select New under Local Git repositories

Create a repo with code in an existing folder

git init foldername
git add --all
git commit -m "Initial commit"

Create the repo from the command line, then open Team Explorer's Connect view and select Add under Local Git repositories

Create a repo from an existing Visual Studio solution

git init foldername
cd foldername
git add --all
git commit -m "Initial commit"

Open the solution and select Publish ( clip_image005[10] ) from the status bar in the lower right.

Create a new repo in your Team Project

Not applicable

From the web, select Code, then select the drop-down next to the current repo name and choose New Repository...

Clone a repo into a local folder

git clone URL foldername

Select Clone under Local Git repositories in Team Explorer's Connect view

Clone a repo in your Team Project

git clone URL foldername

Open the Connect view in Team Explorer and right click the Git repo in your Team Project under the account name. Select Clone...

Add an existing repo to Visual Studio

Not applicable

Open the solution file in Visual Studio (this will automatically add the repo to Team Explorer) or select Add under Local Git repositories in the Connect view

Delete the Git repo and history, but keep the current version of the files

Delete the hidden .git folder created at the root of the repo

Delete the hidden .git folder created at the root of the repo from Windows Explorer or the command line

Delete a local repo and all files

Delete the folder containing your repo from your computer's filesystem

Close any open solutions using files in the repo, then delete the folder containing your repo from your computer's filesystem.

Delete a repo in your Team Project

Not applicable

Select the settings icon ( clip_image006[14] ) in Team Services/TFS, then select the Version Control tab. Find the Git repository to delete and select the ... next to the name. Choose Delete Repository from the options.

Add a remote

git remote add name url

Open the repository using the Connect view in Team Explorer, then open the Settings view in Team Explorer. Select Repository Settings, and select Add under Remotes

Update a remote

git remote set-url nameurl

Open the repository using the Connect view in Team Explorer, then open the Settings view in Team Explorer. Repository Settings, and select Edit under Remotes

Branches

How do I ?

Git command line

Visual Studio

Create a new branch

git branch branchname

Open the Branches view in Team Explorer, then right-click a branch and choose New Local Branch From...

Swap to a different branch

git checkout branchname

Open the Branches view in Team Explorer, then double click a local branch. Alternatively, click the current branch name from the status bar and select a different branch.

Delete a local branch

git branch -d branchname

Open the Branches view in Team Explorer, then right-click the branch and select Delete. You must be checked out to a different branch than the one you want to delete.

Delete a remote branch

git push origin --delete branchname

Open the Branches view in Team Explorer, expand the remote that has the branch you want to delete. Right-click the remote and select Delete Branch from Remote

Set a default branch in your Team Services/TFS repo

Select the settings icon on the web ( clip_image006[15] ), then select the Version Control tab. Select your Git repository, then select the ... next to the branch name and choose Set as default branch

Same as command line

Commits

How do I ?

Git command

Visual Studio

Create a new commit

git commit -m "message"

Open the Changes view in Team Explorer. Stage changes by right-clicking on the modified files and selecting Stage. Enter a commit message and select Commit Staged.

Amend the last commit with staged changes

git commit --amend -m "Updated message"

Open the Changes view in Team Explorer, stage your changes, then select Amend Previous Commit from the Actions drop-down.

Stage all file changes

git add --all

Open the Changes view in Team Explorer. Select the + icon in the Changes list to stage all changes for the next commit.

Stage a specific file change

git add filename

Open the Changes view in Team Explorer. Stage changes by right-clicking on the changed file and selecting Stage.

Review unstaged changes

git status --untracked

Open the Changes view in Team Explorer. Unstaged changes are listed under Changes section.

Delete a file

git rm filename
git commit -m "Deleted filename"

Delete the file through Solution Explorer, the command line, or any other means. Right-click the deleted file in Team Explorer's Changes view and select Stage . Select Commit Staged to commit the deletion.

Move a file

git mv filename
git commit -m "Moved filename"

Move a file from one location to another in your repo through Solution Explorer, the command line, or any other means. Right-click the moved file in Team Explorer's Changes view and select Stage . Select Commit Staged to commit the move.

Tag a commit

git tag -a tagname -m "description"

Open the Changes view in Team Explorer, then choose View history..." from the Action drop-down. Locate the commit in thie History view, then right-click and select Create Tag

Compare files and versions

How do I ?

Git command

Visual Studio

Compare the current contents of a single file and the contents in the last commit

git diff HEAD filename

Right-click on the change in the Changes view in Team Explorer and select Compare with unmodified.

Compare your current version with a branch

git diff branchname

Right-click on a file in Solution Explorer and select View History..., then select both on the latest commit on your current branch and the latest commit on the remote branch. Right-click and select Compare

Compare changes between two branches

git diff branchname1branchname2

Right-click on a file in Solution Explorer and select View History..., then select the most recent commits for both branches. Right-click and select Compare

Share code with push | Team Services Git tutorial
Update your code with fetch and pull | Team Services Git tutorial
Resolve merge conflicts | Team Services Git tutorial

Merge and rebase

How do I ?

Git command

Visual Studio

Merge a branch into the current branch

git merge branchname

In the Team Explorer Branches view, right-click the branch you want to merge and select Merge From... Verify the options set and select Merge.

Merge a remote branch into the current branch

git pull origin branchname

In the Team Explorer Branches view, right-click the remote branch you want to merge and select Merge From... Verify the options set and select Merge.

Rebase your current branch onto the history of another branch

git rebase branchname

In the Team Explorer Branches view, right-click the branch you want to rebase your current branch changes onto and select Rebase Onto.."

Do an interactive rebase of the last n commits

git rebase -i HEAD~n (Linux and macOS)
git rebase -i "HEAD^n" (Windows)

Use command line

Cherry-pick a commit into the current branch

git cherry-pick commitID

Open the Changes view in Team Explorer, then choose View history..." from the Action drop-down. Locate the commit in thie History view, then right-click and select Cherry-pick


Undo

WARNING : Must be experienced

How do I ?

Git command

Visual Studio

Revert all changes and roll back to the most recent commit

git reset --hard HEAD

Open the Changes view in Team Explorer. Select Actions and choose **View History from the drop-down. Right-click the commit where the branch is currently located and select Reset and Delete changes....

Revert staging of files, but keep file changes

git reset --mixed HEAD

Open the Changes view in Team Explorer. Select Actions and choose **View History from the drop-down. Right-click the commit where the branch is currently located and select Reset and Keep changes....

Delete untracked files

git clean -f

In the Changes view in Team Explorer, right-click the files to remve under Changes marked with [add] and select Delete.

Reset your local branch to the most recent commit on a remote branch

git reset --hard remote/branchname
(for example, git reset --hard origin/master)

Right-click the branch from Team Explorer's Branches view and select Reset and Delete changes....

Revert a commit pushed to a remote repository

git revert commitID

Open the Changes view in Team Explorer. Select Actions and choose **View History from the drop-down. Right-click the commit to revert and select Revert.