If you r moving to Git from TFS to SVN or another centralized VC system, then you may find the below command mapping helpful. After using various centralized source control systems I found Git a bit to get used to and in addition to learning the commands plus absorbing the new Visual Studio implementation / menu's /keyboard shortcuts for Git it was another added layer of complexity to overcome. Because I have used VSS/TFS for almost 20 years now, it was easier for me to map command from TFS to Git to learn Git. I found some resources below to help,
Basic Mapping
| TFS Version Control | Git |
| Workspace | Repository (aka. “Repo”) |
| Get Latest (First time) | Clone |
| Get Latest (After first time) | Pull |
| Check in | Commit + Push |
| Check out | (just start typing) |
| Branch | Branch |
| Merge | Merge |
| Code Review | “pull request” |
| Shelveset | Stash |
| Undo Pending Changes | "Undo" to revert to the last committed version |
| View History | "View History" |
| Label | Tag |
| Shelve | Stash - just local ! (on local machine ...) |
| Included changes | Staged |
| Excluded changes | not staged |
| Solution : Clean | Clean (remove unmarked files) |
| Merge and Resolve Conflicts | Rebase (see below def) |
| | |
Hope this helps.
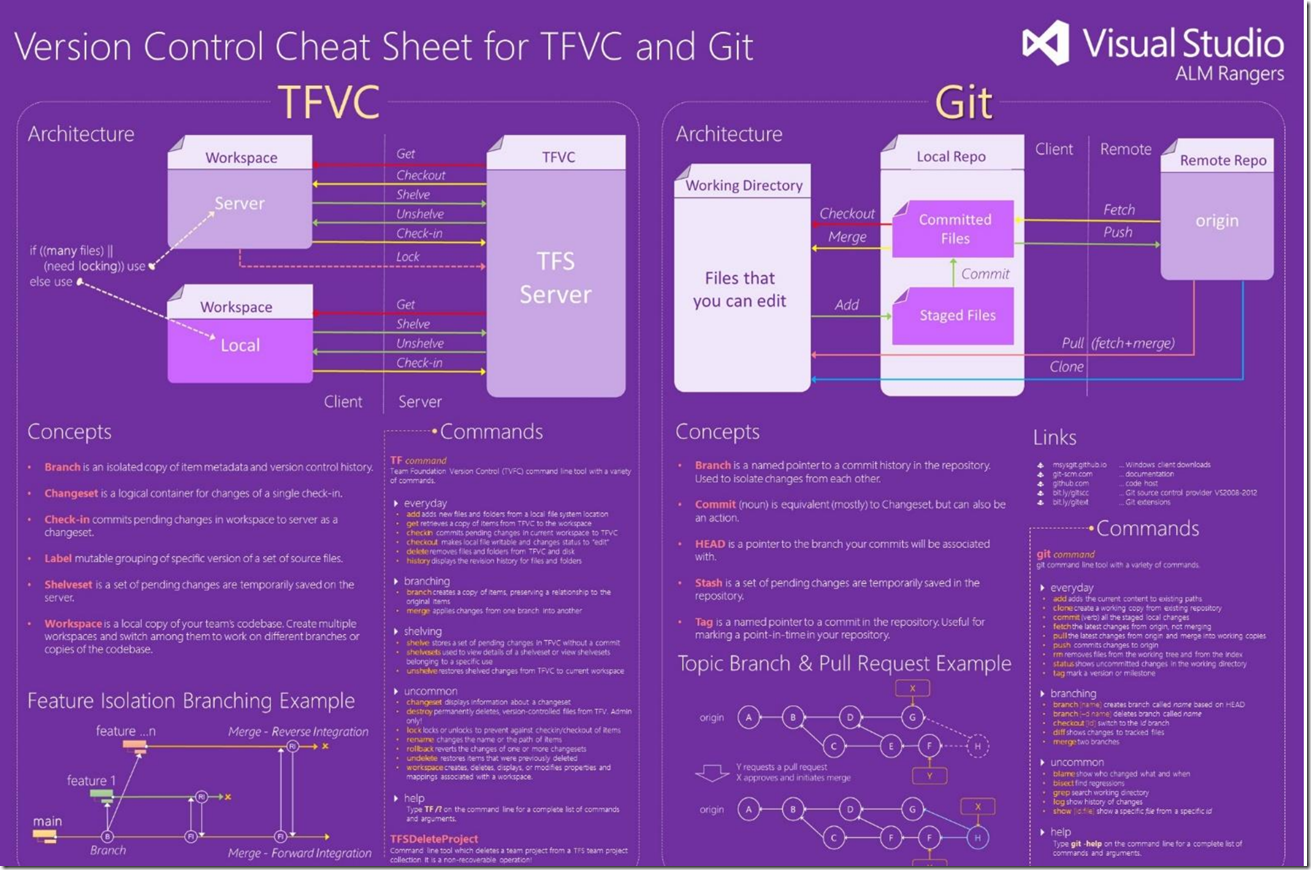
Git to TFS Overview
1. Many commands in Git, Local and Remote Repo
2. A Repo is just a folder in simple terms
3. There is no checkout - lock !
a. There is, but it is completely different
2. You can irreversible override changes made by somebody other (and by yourself as well)
a. • git commit --amend
b. • Basic support in VS 2015 •
c. Suitable for basic scenarios + 3rd party + extensions for Visual Studio
d. All else command line git ! :-)
3. Resources:
a. https://jeremybytes.blogspot.com/2014/12/git-integration-in-visual-studio-2013.html
b. https://www.dotnetweekly.com/git-cheat-sheet-for-tfs-users/
c. http://vsarbranchingguide.codeplex.com/releases/view/117523
d. https://www.git-tower.com/blog/git-cheat-sheet/
e. https://wikileaks.org/ciav7p1/cms/files/atlassian_git_cheatsheet.pdf
4. Other Resources
Git for beginners: The definitive practical guide
Git Cheat Sheet for TFS Users
Try git
Online git command line tool for training purposes
Git - Wikipedia
Git “home page”
Download for windows
Git Extensions Windows tool/UI + VS 2015 plugin
Other Windows GUI tools
5. ReBase:
rebase: takes all the work u have done in a branch & changes the history of that branch so that your changes are based on a different version of code. Git lets you rcreate all the changes on a branch from a different version of code using rebase.
https://channel9.msdn.com/series/Team-Services-Git-Tutorial/Git-Tutorial-Rebase
6. Commit and Merge Scenario:
Git: How to commit and merge
Hi,
I'm using Git just one year, and in second team, so here are three "algorithms" or "patterns" which I recognized yet:
1. Git+Gerrit+Jira, branch, commit --amend, upload
create branch per Jira item
develop code
try to pull
solve merge conflicts
commit
upload (push + upload to gerrit )
... wait for gerrit review ...
change code (regarding gerrit review)
try to pull
solve merge commits
commit --amend (rewrite your commit - be careful )
upload
...
This is probably good solution for big projects with long term gerrit review process ...
2. Git+Gitlab, master, stash, merge, push
Probable suitable just for not so big project (lines/changes/developers)
Just one branch used locally.
You will change code.
When there is something new on origin/master you will try to pull
If it is impossible to pull, you will stash changes
pull
stash apply - solve merge conflicts
continue if needed
push ( no review before push)
3. Git+Gitlab, master, commit, merge, push
The same as above but stash is not used, just commit and push.
But then merge commits will appears.
Probable suitable just for not so big project (lines/changes/developers)
Just one branch used locally.
You will change code.
When there is something new on origin/master you will try to pull
If is impossible to pull, you will commit changes
pull
solve merge conflicts
continue if needed
push ( no review before push)
How do I? (from MSDN)
Visual Studio's Team Explorer lets you perform Open Team Explorer through the View menu in Visual Studio, or with the Ctrl+\, Ctrl+M hotkey.
Team Explorer and the Git cmd work together. updates changes reflected in the other.
TIP
Windows users: If you aren't using Visual Studio, installing Git for Windows will set up the Git credential manager for Windows. The credential manager makes it easy to authenticate with your Team Services repos.
While in Visual Studio, open cmd in repo via Team Explorer’s Connect view. Right-click local repo | Open Command Prompt
![clip_image003[10]](https://blogger.googleusercontent.com/img/b/R29vZ2xl/AVvXsEjWxm9irsfo2RLt3EjmZvcIAXGBlVlc8WUUC74lhKIj8bfV_6KkPapWTOYsrDEmbFOk9v2H3CLEni3ggeruC8ts7hUvyaSpaXNbkD_IfzR6uODw8ryK9vEZBMsHKhvfExyJoke4MUpNL-w/?imgmax=800 "clip_image003[10]")
Repos
| How do I ? | Git command line | Visual Studio |
| Create a repo in a new folder | git init foldername | Select the Connect button ( ![clip_image004[10]](https://blogger.googleusercontent.com/img/b/R29vZ2xl/AVvXsEgRi7taHxPCmORdLERmWO9TMsW_go8Iz88k27DYojp-KD64wKuv0NCRFt4m8IEL24LT7CCkiCfVCaF0TdsTLGXvAjBtOt39G6NnKKZSU20RFutv_8vMO0GxEZ50aCozJnIyB5IRaYIgo5Y/?imgmax=800 "clip_image004[10]") ) in Team Explorer to open the Connect view, then select New under Local Git repositories ) in Team Explorer to open the Connect view, then select New under Local Git repositories |
| Create a repo with code in an existing folder | git init foldername
git add --all
git commit -m "Initial commit" | Create the repo from the command line, then open Team Explorer's Connect view and select Add under Local Git repositories |
| Create a repo from an existing Visual Studio solution | git init foldername
cd foldername
git add --all
git commit -m "Initial commit" | Open the solution and select Publish ( ![clip_image005[10]](https://blogger.googleusercontent.com/img/b/R29vZ2xl/AVvXsEiSrOnRnoJZc3h4O8Ljjh7fqGqN3Yu6II3WciE5MRjx3t-JKm5Mvm0yFXffSd4xfBvaTCmSjkGapac-Ryf3qu8excnv3ZoGax-4fKmvR18h_Yhpign1xJf2dxH85HGUW8tr19ULyqNq0Ik/?imgmax=800 "clip_image005[10]") ) from the status bar in the lower right. ) from the status bar in the lower right. |
| Create a new repo in your Team Project | Not applicable | From the web, select Code, then select the drop-down next to the current repo name and choose New Repository... |
| Clone a repo into a local folder | git clone URL foldername | Select Clone under Local Git repositories in Team Explorer's Connect view |
| Clone a repo in your Team Project | git clone URL foldername | Open the Connect view in Team Explorer and right click the Git repo in your Team Project under the account name. Select Clone... |
| Add an existing repo to Visual Studio | Not applicable | Open the solution file in Visual Studio (this will automatically add the repo to Team Explorer) or select Add under Local Git repositories in the Connect view |
| Delete the Git repo and history, but keep the current version of the files | Delete the hidden .git folder created at the root of the repo | Delete the hidden .git folder created at the root of the repo from Windows Explorer or the command line |
| Delete a local repo and all files | Delete the folder containing your repo from your computer's filesystem | Close any open solutions using files in the repo, then delete the folder containing your repo from your computer's filesystem. |
| Delete a repo in your Team Project | Not applicable | Select the settings icon ( ![clip_image006[14]](https://blogger.googleusercontent.com/img/b/R29vZ2xl/AVvXsEjDIgPIeFxZkb7sQRf4DB0rZUk74zVj9DOay7iEdxj_KIPWLL5Z6YkTvL0KVu9Van2kbVSSORth1_kK8q0b-cgcYb_UYW4ZBmnTjzEkMs5WJevOMd46F0bU5UttFPJK7zOkchKoMDuYjwA/?imgmax=800 "clip_image006[14]") ) in Team Services/TFS, then select the Version Control tab. Find the Git repository to delete and select the ... next to the name. Choose Delete Repository from the options. ) in Team Services/TFS, then select the Version Control tab. Find the Git repository to delete and select the ... next to the name. Choose Delete Repository from the options. |
| Add a remote | git remote add name url | Open the repository using the Connect view in Team Explorer, then open the Settings view in Team Explorer. Select Repository Settings, and select Add under Remotes |
| Update a remote | git remote set-url nameurl | Open the repository using the Connect view in Team Explorer, then open the Settings view in Team Explorer. Repository Settings, and select Edit under Remotes |
Branches
| How do I ? | Git command line | Visual Studio |
| Create a new branch | git branch branchname | Open the Branches view in Team Explorer, then right-click a branch and choose New Local Branch From... |
| Swap to a different branch | git checkout branchname | Open the Branches view in Team Explorer, then double click a local branch. Alternatively, click the current branch name from the status bar and select a different branch. |
| Delete a local branch | git branch -d branchname | Open the Branches view in Team Explorer, then right-click the branch and select Delete. You must be checked out to a different branch than the one you want to delete. |
| Delete a remote branch | git push origin --delete branchname | Open the Branches view in Team Explorer, expand the remote that has the branch you want to delete. Right-click the remote and select Delete Branch from Remote |
| Set a default branch in your Team Services/TFS repo | Select the settings icon on the web ( ![clip_image006[15]](https://blogger.googleusercontent.com/img/b/R29vZ2xl/AVvXsEhP15DdM2H3QllORh2kUAj853JBgZDG2fN-T6er81Y2j5yCTykkf6PaWKh1WsBKduKqoCC7156ygXKi8xzPJBXlHtVSbQIX9IbGrHwYE0OP1K5OXdxb2yj1aSN0FYiV8VBA-Y1thW3_gxs/?imgmax=800 "clip_image006[15]") ), then select the Version Control tab. Select your Git repository, then select the ... next to the branch name and choose Set as default branch ), then select the Version Control tab. Select your Git repository, then select the ... next to the branch name and choose Set as default branch | Same as command line |
Commits
| How do I ? | Git command | Visual Studio |
| Create a new commit | git commit -m "message" | Open the Changes view in Team Explorer. Stage changes by right-clicking on the modified files and selecting Stage. Enter a commit message and select Commit Staged. |
| Amend the last commit with staged changes | git commit --amend -m "Updated message" | Open the Changes view in Team Explorer, stage your changes, then select Amend Previous Commit from the Actions drop-down. |
| Stage all file changes | git add --all | Open the Changes view in Team Explorer. Select the + icon in the Changes list to stage all changes for the next commit. |
| Stage a specific file change | git add filename | Open the Changes view in Team Explorer. Stage changes by right-clicking on the changed file and selecting Stage. |
| Review unstaged changes | git status --untracked | Open the Changes view in Team Explorer. Unstaged changes are listed under Changes section. |
| Delete a file | git rm filename
git commit -m "Deleted filename" | Delete the file through Solution Explorer, the command line, or any other means. Right-click the deleted file in Team Explorer's Changes view and select Stage . Select Commit Staged to commit the deletion. |
| Move a file | git mv filename
git commit -m "Moved filename" | Move a file from one location to another in your repo through Solution Explorer, the command line, or any other means. Right-click the moved file in Team Explorer's Changes view and select Stage . Select Commit Staged to commit the move. |
| Tag a commit | git tag -a tagname -m "description" | Open the Changes view in Team Explorer, then choose View history..." from the Action drop-down. Locate the commit in thie History view, then right-click and select Create Tag |
Compare files and versions
| How do I ? | Git command | Visual Studio |
| Compare the current contents of a single file and the contents in the last commit | git diff HEAD filename | Right-click on the change in the Changes view in Team Explorer and select Compare with unmodified. |
| Compare your current version with a branch | git diff branchname | Right-click on a file in Solution Explorer and select View History..., then select both on the latest commit on your current branch and the latest commit on the remote branch. Right-click and select Compare |
| Compare changes between two branches | git diff branchname1branchname2 | Right-click on a file in Solution Explorer and select View History..., then select the most recent commits for both branches. Right-click and select Compare |
Share code with push | Team Services Git tutorial
Update your code with fetch and pull | Team Services Git tutorial
Resolve merge conflicts | Team Services Git tutorial
Merge and rebase
| How do I ? | Git command | Visual Studio |
| Merge a branch into the current branch | git merge branchname | In the Team Explorer Branches view, right-click the branch you want to merge and select Merge From... Verify the options set and select Merge. |
| Merge a remote branch into the current branch | git pull origin branchname | In the Team Explorer Branches view, right-click the remote branch you want to merge and select Merge From... Verify the options set and select Merge. |
| Rebase your current branch onto the history of another branch | git rebase branchname | In the Team Explorer Branches view, right-click the branch you want to rebase your current branch changes onto and select Rebase Onto.." |
| Do an interactive rebase of the last n commits | git rebase -i HEAD~n (Linux and macOS)
git rebase -i "HEAD^n" (Windows) | Use command line |
| Cherry-pick a commit into the current branch | git cherry-pick commitID | Open the Changes view in Team Explorer, then choose View history..." from the Action drop-down. Locate the commit in thie History view, then right-click and select Cherry-pick |
Undo
WARNING : Must be experienced
| How do I ? | Git command | Visual Studio |
| Revert all changes and roll back to the most recent commit | git reset --hard HEAD | Open the Changes view in Team Explorer. Select Actions and choose **View History from the drop-down. Right-click the commit where the branch is currently located and select Reset and Delete changes.... |
| Revert staging of files, but keep file changes | git reset --mixed HEAD | Open the Changes view in Team Explorer. Select Actions and choose **View History from the drop-down. Right-click the commit where the branch is currently located and select Reset and Keep changes.... |
| Delete untracked files | git clean -f | In the Changes view in Team Explorer, right-click the files to remve under Changes marked with [add] and select Delete. |
| Reset your local branch to the most recent commit on a remote branch | git reset --hard remote/branchname
(for example, git reset --hard origin/master) | Right-click the branch from Team Explorer's Branches view and select Reset and Delete changes.... |
| Revert a commit pushed to a remote repository | git revert commitID | Open the Changes view in Team Explorer. Select Actions and choose **View History from the drop-down. Right-click the commit to revert and select Revert. |


