Thursday, August 10, 2017

Summary of how to Fix slow WIFI networks

Excerpts from

Fix #1: Use the Correct Measure


     To get a more accurate measure of the speed of your wireless connection, you need to use a method that actually measures the speed that your connection is delivering. include:
     Timing a drag-and-drop filecopy and calculating speed (file size / transfer time). LAN Speed Test does essentially the same thing, but automatically for Windows-based systems.
     Running a file copy and using the Networking monitor in Windows Task Manager or Vista's Reliability and Performance Monitor (Start > Run perfmon.msc)
     Using NetMeter while watching or listening to a stream or transferring files. (There is also a similar program of the same name from Brothersoft.)
     Tools: Simpli-File Statistics, FastCopy.exe

Fix #2: Use 802.11n Clients


     Only an 802.11n client has what it takes to get higher throughput from a draft 11n router.
     802.11n can provide higher throughput at a given location than 802.11b/g

Fix #3: Don't Connect Draft 11n and 11b/g clients to the same router


     mixing 11n and "legacy" clients can reduce throughput by 50 to 80%.
    

Fix #4: Use WPA2/AES and Enable WMM


     Most 802.11n products will knock your throughput down by up to 80% if you use WEP or WPA/TKIP security
     WMM must be enabled in order to get link rates higher than 54 Mbps

Fix #5: Don't use Channel Bonding


     Channel-bonding trick can provide a 10 to 20 Mbps throughput increase, but usually works best under strong signal conditions.

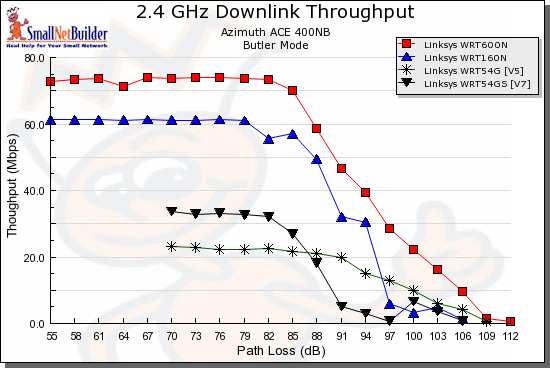
Downlink throughput comparison - Linksys

Sunday, August 6, 2017

Tweak Windows 7 Performance

Subset of Black Vipers awesome tips!


Remove/Disable following to improve Win7 performance:

1) Restore and Windows Search (Indexing) Features

Get rid of System Restore and file versioning. Where do you find it?

With the default Category Control Panel:

  1. Head to Start
  2. Select Control Panel
  3. Select System and Security
  4. Select System
  5. Select System Protection (on the left side)
  6. Select the Continue button (if UAC is active)
  7. Select System Protection Tab (should be there already)
  8. Select a hard drive listed under "Protection" that has "On" in the column
  9. Select the Configure button
  10. Select the "Turn off system protection" radio button
  11. Drag the "Max Usage" slider all the way to the left to 1%
  12. Select the Delete button if you wish to get rid of the current backups (not a wise idea if you are wanting to keep System Restore active)
  13. Select the Ok button to apply the settings (you may get several warning dialogs that you have too little space allocated or that you are deleting old restore points.

You can now disable the Windows Search Feature:

With the default Category Control Panel:

  1. Head to Start
  2. Select Control Panel
  3. Select Programs
  4. Select under Programs and Features "Turn Windows Features on or off"
  5. Scroll down to Windows Search and uncheck it
  6. Select the Ok button to close the panel

Number Three: Remote Assistance and Remote Desktop

Remove Remote Assistance and ensure Remote Desktop is disabled.

Take Note: Remote Desktop is not available on Windows 7 Starter, Home Basic or Home Premium, so the option will not be there.

Where do you find it?

With the default Category Control Panel:

  1. Head to Start
  2. Select Control Panel
  3. Select System and Security
  4. Select System
  5. Select Remote settings (on the left side)
  6. Select the Continue button (if UAC is active)
  7. Uncheck "Allow Remote Assistance connections to this computer " option
  8. Ensure "Don’t allow connections to this computer" option is checked
  9. Select the Ok button to apply the settings

Number Four: Aero (Themes)

Reduce the overhead associated with Windows 7 new Theme. As a side note, the new Aero is a big reason to upgrade to Windows 7 and I really enjoy the new look. However, if you are using an older system that does not meet the recommended requirements to run the Aero Glass engine or have a system that does not have Windows 7 certified driver support, disable the themes to make it look like Windows 2000/XP (with its new theme disabled) and save the memory.

Also, in order to get back Aero Themes selection (after performing these steps, they will be grayed out of selection), you will have to reverse (enable) the features and reboot.

With the default Category Control Panel:

  1. Head to Start
  2. Select Control Panel
  3. Select Appearance and Personalization
  4. Select Personalization
  5. Select Theme
  6. Under Basic and High Contrast Themes, select "Windows Classic"

Fine tune visual performance options:

With the default Category Control Panel:

  1. Head to Start
  2. Select Control Panel
  3. Select System and Security
  4. Select System
  5. Select Advanced system settings (on the left side)
  6. select Advanced tab
  7. Select Settings button under Performance
  8. Select "Adjust for best performance."
  9. Select the Ok button

In order to shrink up the task bar to be only "one line", you will need to check another box located here:

  1. Right click the taskbar where there is nothing at
  2. Select Properties
  3. Taskbar tab
  4. Check "Use small icons"

After that, Disable and Stop the Themes service.

With the default Category Control Panel:

  1. Head to Start
  2. Select Control Panel
  3. Select System and Security
  4. Select Administrative Tools
  5. Select Services
  6. Select "Themes" service (Double Click)
  7. Select General Tab
  8. In the Startup type: select "Disabled"
  9. In the Service status area: select "Stop"
  10. Select the Ok button to close the panel

You may also want to disable the Desktop Window Manager Session Manager Service

  1. Head to Start
  2. Select Control Panel
  3. Select System and Security
  4. Select Administrative Tools
  5. Select Services
  6. Select "Desktop Window Manager Session Manager" service (Double Click)
  7. Select General Tab
  8. In the Startup type: select "Disabled"
  9. In the Service status area: select "Stop"
  10. Select the Ok button to close the panel

Rebooting is not required as each action performed above is applied at the time it is finished.

Number Seven: Add/Remove Programs remove unnecessary apps


UnInstall Avast,

Old KB Files/

Run Disk Cleanup

MsConfig

Hijack This

then

Malware Bytes for a scan
Saturday, August 5, 2017

Disable OTA Updates

Finally a good ref on disabling the Android OTA works on TM H901 V10

Check here

and Droid Forums

How to play a PlayList on Android that uses music files on an smb share (Windows or NAS, ect)

Plus, how to share Playlists between Windows and Android, for music stored on a NAS device.

Using VLC:

1. Windows: Place your music on network share

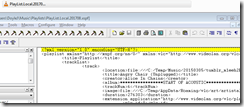
2. Windows: Create a play list in xspf format
image

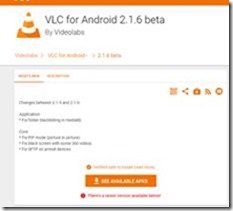
3. Android: Download VLC (do NOT use 2.0.6, there is bugs with SMB authentication, see https://forum.videolan.org/viewtopic.php?t=45228)

a. Download VLC 2.1.6,

b. http://www.apkmirror.com/apk/videolabs/vlc/vlc-2-1-6-release/

c. clip_image002

4. Android Create a playlist in android,

clip_image004

5. Android: then view the playlist in SQL Editor,

a. They store playlist as a SQLLite DB, thus download DB tool and view playlist

https://android.stackexchange.com/questions/15045/where-and-how-does-android-store-music-playlists

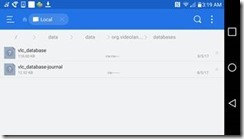
b. We want to get the exact format that Android VLC uses for path to mp3/music files

DB is stored in

./data/data/org.vlc/Databases

c. clip_image006 clip_image008

d

6.

Then Open Windows playlist and replace all the windows paths with remote paths:

File\\C:\Hello

Smb://Server/Hello

clip_image010

Replace each local path with remote path in xspf from step 1

clip_image012

Optional, replace artwork refs (anything local)

clip_image014

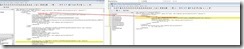
After Search and Replace, comparing the remote and local file:

clip_image016

Save the xspf to network share Open this file in Androoid VLC as a remote file,

you can now play mp3 files on your network share!

Optional: Tune VLC

Per : https://forum.videolan.org/viewtopic.php?f=35&t=102250&p=458563&hilit=playlist#p458563
Hardware Acceleration ----> Full
Performance ----> Deblocking Filter Settings ------> Full
Performance ----> Enable Frame Skip -----> (check) (yes)

Similar article, using adb, I didn’t try this

http://vlc-playlist-android.blogspot.com/

Other paths tried:

clip_image018

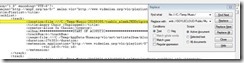
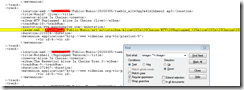
Use Text Pad to replace XML Element with a blank (any) string

Using simple regex, we can find every element that matches a certain name and replace that line with something else.

Reg ex:

<image>.*?</image>

Be sure to format your xml DOM before pasting into text pad, to ensure line seperation.

Screenshot_1

Wednesday, June 28, 2017

Top tools for Photo - Image and Video Organizing. Auto Organize your media files!


** Updated 20180624:

I am SO far behind in organizing and posting pics and videos (probably over a year behind) and Im trying to find some tools to get the job moving so I can finally organize and POST content!!

Uggh, Ifg ur like me and U are working 80-90 hrs per week but wanna find time to share memories with friends and family, then pleae check out the below tools and let me know if U have a good tool to!!!


1. Organize files into Folders

2. Remove Dups

3. Rename files or folders based on custom criteria


Here is a good How-To, and “why” for oragnizing files (for Windows users, sorry Mac/Linux I just dont understand U users , lol, JK)

http://www.richardhartley.com/2014/10/how-can-i-organise-all-my-digital-photos/

These 3 requirements I found to be satisfied by the following tools:

1. Organize files into Folders

BEST ONE!

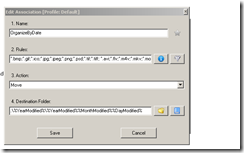
DropIt!, excellant tool, does everything and more for organizing files into folders, Download it here

Examples:

    http://www.dropitproject.com/dokuwiki/doku.php?id=howto:customize_destinations

More Below

PhotoMove 2.5

http://www.mjbpix.com/automatically-move-photos-to-directories-or-folders-based-on-exif-date/

Files to Folders

http://skwire.dcmembers.com/fp/?page=files-2-folder


2. Remove Dups


BEST ONE, SOOO Easy to use, and super Powerful!

http://www.softpedia.com/get/System/File-Management/AllDup.shtml

Others:

http://www.softpedia.com/get/File-managers/Duplicate-File-Finder-Plus.shtml
http://www.softpedia.com/dyn-postdownload.php/8d89adeeca432495c6e33a359f641433/5954b8c1/20fc2/0/1
http://www.softpedia.com/dyn-postdownload.php/e85705567d417d8c10346b202e4613f4/5954b8cc/1ce62/0/1
http://www.softpedia.com/get/System/File-Management/Yet-Another-Duplicate-File-Remover.shtml
http://www.softpedia.com/get/Others/File-CD-DVD-Catalog/Media-Commander.shtml
http://www.softpedia.com/get/System/File-Management/Auslogics-Duplicate-File-Finder.shtml#download


https://www.fosshub.com/VisiPics.html (32BIT ONLy)


3. Rename files or folders based on custom criteria


http://www.bulkrenameutility.co.uk/Download.php
http://www.tpsort.com/similar-to/31289-top-15-photomove-alternative-and-similar-softwares


4. Even more tools!

Drop It Examples

Selected date abbreviations will be added in your destination field and during process they will be replaced with the correct file date. Some examples of destination folders:

C:\Images\%DateTaken%

C:\Images\%YearTaken% – %MonthTaken%

C:\Images\%YearTaken%\%MonthTaken%\%DayTaken%

and more examples

  • absolute paths to local folders (e.g. C:\Folder\Subfolder);

  • relative paths to local folders (e.g. ..\..\Other Folder), relatively to each loaded file;

  • UNC paths to shared folders (e.g. \\ComputerName\SharedFolder\Resource);

  • abbreviations (generally known as “environment variables”, they are one of the most powerful and flexible features to customize destinations).

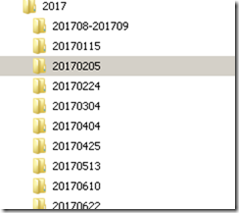
and my example:

%YearModified% = year file modification [“2014”]
%MonthModified% = month file modification [“02”]
%DayModified% = day file modification [“14”]

Destination:

.\%YearModified%\%YearModified%%MonthModified%%DayModified%

to create folders:

Screenshot_1

Screenshot_4


Show Folder Sizes! Life got even better, show folder size/usage in once view! What WinExplorer cant do!


     https://www.nodesoft.com/folderusage
    

Move files to Date folder name based on file, using xyPlorer (Cost $$)


     https://www.xyplorer.com/xyfc/viewtopic.php?t=14031
    

Move files to Date folder name based on files, using exiftool


     https://superuser.com/questions/461242/need-to-reorganize-pictures-in-folders-named-by-date
         Open your terminal:
         In Windows, press WinR and type cmdEnter,
         On Mac, press cmdspace and type term↩
         Navigate to the folder where your pictures are. On Mac you would type something like
         cd /Volumes/MyUSBDrive/Pictures. In Windows you would type E:Entercd Pictures. Use your own folder path here, of course.
         Now launch exiftool and let it do its job:
              exiftool -d %Y/%Y-%m-%d/%Y-%m-%d-%Hh%Mm%S.%%e "-filename<datetimeoriginal" . (the dot at the end refers to current directory)
     and


        Some people assign their own priority by using different exiftool lines in a batch like:
         exiftool -filename^<DateTimeOriginal -d "C:\Users\Tommy44\Pics\%%Y-%%m-%%d\%%%%f.%%%%e" "C:\Users\Tommy44\Pics"
         exiftool -filename^<CreateDate -d "C:\Users\Tommy44\Pics\%%Y-%%m-%%d\%%%%f.%%%%e" "C:\Users\Tommy44\Pics"
         exiftool -filename^<ModifyDate -d "C:\Users\Tommy44\Pics\%%Y-%%m-%%d\%%%%f.%%%%e" "C:\Users\Tommy44\Pics"
         exiftool -filename^<DateDigitized -d "C:\Users\Tommy44\Pics\%%Y-%%m-%%d\%%%%f.%%%%e" "C:\Users\Tommy44\Pics"

Thursday, June 15, 2017

Solutions for : RDP Tuning, Speed Up Remote Desktop, RDP Frozen Mouse and Keyboard

Issue:

Combined the below tips to solve an overall slow and slugish RDP session between Win7 and Win2012 Server, These tips generally apply to Win7/Win8 and Win2008/2012:

Solutions

1)  Reg Edit –> Tcpip

    Open RegEdit on the Windows Server machine.
    Navigate to this registry key in the tree on the left:
    HKEY_LOCAL_MACHINE\SYSTEM\CurrentControlSet\Services\Tcpip\Parameters
    Right-click on the right side, and add a new DWORD (32-bit) Value
    Set the value name to DisableTaskOffload and the value data to 1
   Reconnect to the Server via RDP (to a new session) and your performance should be normal.

2) Tune RDP Settings in Gpedit.mscQuestion

On the server:
Computer Config > Windows Settings > Administrative Templates > Windows Components > Remote Desktop Services > Remote Desktop Session Host > Connections > Select RDP transport protocol = Use only TCP
On the client:
Computer Config > Windows Settings > Admin Templates > Windows Components > Remote Desktop Services > Remote Desktop Connection Client > Turn off UDP on Client = Enabled


3) Disable FIPS  [Optional]

Found the culprit...FIPS security setting is the cause.  Now why the heck 2012 can't handle FIPS and 2008R2 can is beyond me especially since this security setting comes straight from Microsoft's Security Compliance Manager 3.

I've verified it by disabling the setting and rebooting...nice and fast...enable the setting, reboot...slow...disable/reboot...fast again...and it's only the FIPS setting:

Computer Config>>Policies>>Windows Settings>>Security Settings>>Local Policies>>Security Options>>System Cryptography>>Use FIPS compliant algorithms for encryption, hashing, and signing.


Reference Articles:
BEST:
https://social.technet.microsoft.com/Forums/ie/en-US/6ed6500d-33f7-4f0c-89fb-8d8442c7a229/extremely-slow-rdp-session-solved?forum=winserverTS
and   
https://social.technet.microsoft.com/Forums/windowsserver/en-US/56b3b9a1-3589-451a-afca-71afcc216fd9/remote-system-input-device-not-working?forum=winserverTS

and See

Performance Tuning Windows 2012: Network Subsystem–Part 1